Pages

Friday, 17 June 2022

Strawberry Tea Sandwiches


When I was growing up, June was Strawberry Tea month. The teas were a staple fundraiser for the Women's Institute, various church auxillaries, and the hospital auxillary. They were a variation on a traditional English afternoon tea but somewhat less formal. Tables were often set up outdoors and each was set linens and dishes on loan from the members of whatever group was hosting the tea.  There were often small arrangements of home grown flowers on each table. Most importantly though, each course served included strawberries. 

All of the food at a strawberry tea was prepared by volunteers, in their homes, then carried to the event. (You wouldn't get away with that now, I know.)  Recipes were not shared. It's not that the food was complicated, but exact proportions of ingredients were often treated as something resembling a state secret. As a result, when I set out to make the sandwiches for this post, I had to rely on my memory, some experimentation, and a willingness to adapt what I remember to suit more modern tastes.

I'm sharing three strawberry tea sandwiches.  All are very simple to make and use ingredients readily available. 

I should take a moment to talk about bread: 

The sandwiches at the teas I remember were made from sandwich loaves ordered specially from the bakery. The loaves were rectangular, with four straight sides, and sliced thinner than regular bakery loaves. The straight sides ensured less waste when trimming crusts and cutting shapes. The thinner slices were a convention carried over from Victorian times. They were considered more refined, and they also appealed to the Victorian enthusiasm for thrifty household management. You can get more sandwiches out of each loaf if the slices are cut thin. 

These days, rectangular sandwich loaves can be hard to find.  It may be worth asking your local baker about them but, if you can't get them, there are ways to make the most of whatever bread you have available to you. I used my home baked bread for these sandwiches. To make it easier to slice, I put it in the freezer for a while, until it had firmed up enough that I could more easily cut thin, even slices. Don't get too invested in perfection though: My shaky hands make such precise work a real challenge and my sandwiches are often far from perfect in appearance.  Even so, grouped together on a plate, they make a pretty enough presentation that I feel comfortable serving them to guests.

Here are my strawberry sandwiches. Other than the quantities given for the dressing used to make the chicken salad in the third sandwich, how much of each ingredient you use is really up to you.

Strawberry and Goat Cheese

Soft goat cheese (I used a local one, made here on the island)
Freshly ground black pepper, medium grind
Sliced strawberries
Thinly sliced bread

Allow the goat cheese to come to room temperature. Put it in a large bowl and add a splash of milk, then beat it until it's soft and fluffy. It's best to start with a very small amount of milk and add more bit by bit if needed.

Spread the cheese fairly thickly on a slice of bread and then grind a generous quantity of pepper over top. (Pepper plays brilliantly with strawberries.)

Remove the stems from the strawberries, then slice them vertically into slices about 1/8 inch thick. Arrange the slices in a single layer over the cheese.

Place a slice of bread on top of the strawberries. Press gently on the sandwich so that the strawberries settle into the goat cheese, then trim the crusts from the sandwich, cutting it into a tidy rectangle. Cut the rectangle into 4 triangles or into small squares.


Strawberry, Basil, and Two Cheeses

This is a variation on a Caprese salad, definitely not a combination you'd've seen at long ago teas but it's delicious.

Ricotta cheese
Finely grated Mozzarella cheese
Strawberries
Whole basil leaves
Thinly sliced bread

In your food processor with the blade attachment or the bowl of your stand mixer with a paddle attachment, combine 1 part ricotta and 2 parts grated mozzarella. Process or mix the two cheeses together until thoroughly combined. If you need to, add some milk - a few drops at a time - until the cheese mixture is a spreadable consistency.

Lay out two slices of bread and spread a layer of cheese on each slice. Cover the cheese on one slice of bread with sliced strawberries (cut as directed in the first recipe) and top the berries with whole basil leaves, stems removed. Finish the sandwich with the second slice of bread, cheese side down towards the basil.  Trim the crusts from the sandwich to form a neat rectangle, then cut the rectangle into four triangles or small squares.

Because there's nothing to bind the strawberries and basil together, these sandwiches tend to fall apart when cut into small shapes. In order to keep each small sandwich intact while plating, I place a strawberry heart garnish (simple to cut with a good sharp paring knife) atop each one and then spear through the garnish and the sandwich with a toothpick.


Chicken Salad With Strawberries

1 Tablespoon plain Greek yogurt
2 teaspoons red wine vinegar (or strawberry infused white vinegar if you have it in the pantry)
1 teaspoon honey
1 teaspoon poppy seeds
1 teaspoon lemon zest
pinch of salt
2 Tablespoons of sunflower oil
1 stalk of celery
1 cooked chicken breast, skin and bones removed (I saved mine from a roast chicken but you can poach the chicken breast in either chicken or vegetable stock if you prefer.)
Strawberries
Thinly sliced bread
Butter

Put Greek yogurt, vinegar, honey, poppy seeds, lemon zest, and salt in a small mason jar.  Give the ingredients a thorough stir so they're well combined and the salt has had an opportunity to dissolve. Add in the sunflower oil.  Put a lid on the jar and give it a good shake.  Set the prepared dressing aside.

Trim the top and bottom ends of the celery. Make two slices vertically almost all the way from top to bottom, leaving a small section at the top of the stalk uncut so it will hold the strips together, then slice the celery horizontally to make a quarter-inch dice. 

Slice the strawberries vertically into 1/4-inch slices and then cut the slices into 1/4 inch dice.  I can't tell you exactly how many berries you'll need because it will depend both upon the size of the berries and your personal taste.  I reccomend that you use at least as much diced berry as there is diced celery.

Chop the chicken into fine pieces.

Put the celery, strawberries, and chicken into a bowl. Give the dressing another good shake, then add about 2 Tablespoons to the chicken salad mixture.  Give it a stir, then let the ingredients sit for a few minutes. The strawberries will give off some of their juice. If, after it's rested a few minutes, you think the chicken salad needs more dressing, add it in bit by bit, folding the ingredients gently after each addition until the consistency looks right to you.

Put about a quarter of the chicken salad onto each of four slices of bread, then use a fork to spread it out gently to the edges. Top each sandwich with another slice of bread.

Trim the crusts off of the bread, making a tidy rectangle. Cut each rectangle into either 4 triangles or into small squares.


Finish up by arranging your sandwiches prettily on a plate. If you want to, you can garnish the plate with some strawberry slices, tiny basil leaves, or parsley.


About leftovers:

The trimmed edges from the first two sandwiches can be cut into bite sized pieces and used to make a savoury bread pudding.

The trimmings from the chicken salad sandwiches aren't great in a savoury pudding but they do make a fine lunch for the cook once tea preparation is finished.  😉

If you have chicken salad sandwiches left over, take the top slice of bread off each one, add a thin slice of cheese, put the top slice of bread back in place, then toast the sandwiches under a broiler until heated through and lightly browned on both sides.


Friday, 22 April 2022

Keep Lettuce Fresh Longer


In recent conversations, several of my friends have remarked on how much water gets sprayed on lettuce in grocery store produce displays. The lettuce gets so wet that it rots within a couple of days of bringing it home. I know how frustrating that can be so I want to share a simple trick I use to keep lettuce fresh. Stored this way, it lasts days longer.

When I bring lettuce home from the store, I pull it apart, breaking the leaves off from the core and tearing away any discoloured or damaged parts.  I put the leaves in a big bowl and fill the bowl with cold water.  I let the leaves soak for a few minutes, swish them around a bit, lift them out into a strainer, empty the bowl, and rinse it out. I repeat the process twice more so that the lettuce has had three rinses.

After the third rinse, I spread a clean tea towel out on my work surface and lay the leaves out on the towel with some space between them.  If I have more leaves than will fit on a single towel, I lay another towel on top and spread the rest of the leaves on it.  


When the leaves have been spread out on the towel(s), I top them with with another clean towel


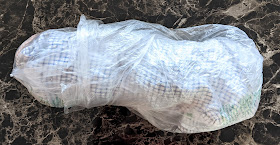
then roll the whole bundle up like a jelly roll.


I (usually) put the roll in a homemade drawstring bag made from cotton and lined with ripstop nylon. When I took these photos, my drawstring bag was in use for foraged greens so I used a couple of plastic bags from the produce section. If you're using plastic bags, slip one over each end of the roll, overlapping in the middle but not tightly fastened.


The reason this trick works is that the towels absorb excess water from the leaves and then the leaves take the water back in as needed. 

There's a bonus too:  Once the lettuce is rinsed and wrapped my prep is done so salad making or sandwich assembly take less time.

I hope you give this a try.  It really does work.


*If you use plastic bags to store your lettuce, please wash them and reuse them, or use them to make plarn (plastic yarn for knitting or crocheting), or recycle them after the lettuce is used up. Don't throw them in the garbage.  Mother Nature and I both thank you for being mindful.

Thursday, 31 March 2022

Thankful Thursday: Celebrating An Unexpected Gift


I think Thankful Thursday may be my favourite social media convention. It's wonderful that in the midst of all the noise, and selling, and argument, and time wasting that floods our feeds every day, so many people have decided to pause and say "Hey! Let's share a moment or two of positivity. Let's pause to celebrate the good things in our lives." I love that Thankful Thursday reminds me to pause and appreciate my good fortune in being who I am, where I am, in the circumstances of the moment.

Today, I'm thinking about an unexpected gift that has come into my life because I'm an artist.

There's a reason the term "starving artist" has become such common currency in our culture. Most artists don't earn a living from their art. They take other jobs to put food on the table, and make art in their precious free time because their hearts tell them they must. And because they must make art, artists seek jobs that allow sufficient flexibility of schedule, sufficient free time, and a minimal emotional investment in order to leave them free to pursue their practice. Typically, jobs that provide the freedom to make art don't pay a lot and, thus, artists develop a parallel skill set to their art: They become very proficient at making the most out of what material things they have.

I'm in my 60's now and, looking back, I see that I had no idea about the range of practical skills I'd develop in order to free up time and space in which I could make art. Without realizing it at the time, I have throughout my life made a series of choices to get by on less money in order to have the freedom to make more art and, in order to do that, I've mastered a wide range of skills that help me stretch my budget.

I learned to grow my own food, and to preserve it for the seasons when food is less abundant. I learned to identify and forage for wild foods. Because basic ingredients are often less expensive than prepared foods, I learned to cook from scratch and mastered skills like bread baking and pasta making. I learned about nutrition so I could derive the most benefit from my food growing efforts and grocery shopping bucks.

I learned to sew clothing, to launder it in ways that cost less money and caused the least amount of wear and tear, and I learned how to mend my clothing when it was damaged. I learned to look at second hand clothing as a resource. I learned to see how clothing could be restyled and altered to fit, and how to make other necessary household items from fabric sourced from 2nd hand clothing and linens. I took the lesson of my grandma's church dress to heart, using and repurposing every piece of clothing and household linen until it was completely worn out. As a result, I wear my clothes for years, and often decades. That's taught me to disregard fashion and, instead, to cultivate my own personal style.

I learned to find joy in activities that cost little money. Walking has become a daily habit for me, both in the course of running errands and for pleasure. I learned to seek out and appreciate the extensive network of recreational trails available to me here on the island. I learned to take my foraging bag with me when I walk so that my outings not only feed my spirit but provide me with food and art materials as well. I learned to find joy in choosing day trips over more extensive vacations and in turning picnic meals into a celebration rather than a mere necessity. I learned to love my local public library and how use inter-library loans as a means to access university libraries when not a student. I learned how to host potluck suppers and group trips to beaches and parks.I embraced the pleasures of letter writing.

So, now, here I am: On the young end of old, chronically ill, living alone on a limited income, and equipped with the skills to turn those circumstances into a life in which I not only get by but actually find joy. Rather surprisingly, I've also learned that being good at being broke is a marketable skill.

How could I possibly not be thankful for the life skills being a "starving artist" has given me?

Which brings me full circle to my appreciation of Thankful Thursday. Today, I'm going to pause and appreciate how my need to do something essentially impractical has brought me such a wonderful set of practical skills.

What are you thankful for today?

Friday, 18 March 2022

Food For Hard Times: Poor Man's Sausage


I was scrolling aimlessly through Pinterest on a recent, rainy evening and came across a recipe from "I Cook and Paint," for Poor Man's Sausage.  I'm trying to find ways to stretch my food budget. I rarely buy sausage any more. I miss it, so I pinned the recipe and, a few days later, gave it a try. 

Poor Man's Sausage dates back to WWII; a recipe devised during a time of stringent rationing.  Meat was in short supply and this dish was intended to provide a substitute acceptable to a nation that grew up on meat and potatoes; folks who missed their morning fry-ups and Sunday roasts a lot. Because it originated during a time of hardship, the ingredients are common and simple as is the preparation.  The finished result is surprisingly good, similar in texture to a ground beef patty, and well flavoured. This recipe could be an appealing choice for those who buy the "Beyond" meat substitutes. It's far less expensive and has fewer additives.

I didn't have on hand all the seasonings listed in the recipe and I reasoned that going out to buy them would defeat the purpose of sparing my budget. I didn't have fennel so I left it out altogether, and I didn't have chili flakes so I increased the amount of black pepper. The finished patties were flavourful but less like Italian sausage than they would have been if I'd added the fennel. I'd add less poultry seasoning next time, but that's a personal preference. You could probably adapt this recipe to resemble any type of sausage you prefer simply by changing the seasonings and the simmering liquid.

I wasn't invested in keeping the dish vegetarian or vegan so I used a strong beef broth for the simmering stage in the cooking process. I reckoned it would add to the meaty flavourof the finished dish. Were I to keep it vegan, I'd want to choose a flavouring with lots of umami, so either soy sauce or liquid aminos.  "I Cook and Paint" thought this stage in the prep was intened to improve the texture of the patties, and I agree, but I also think it also helps the flavours of the seasonings to distribute throughout each patty.  Don't skip the simmering.

Here's the recipe as I amended it.  Please click through to the original recipe post for the preparation instructions. 

1 cup quick cooking (not instant) rolled oats
2 teaspoons poultry seasoning
1 teaspoon sweet paprika
1 teaspoon onion powder
1 teaspoon garlic powder
2 teaspoons parsley flakes
3/4 teaspoon salt
3/4 teaspoon black pepper
2 extra large eggs, beaten
2 cups beef stock

The posted recipe says this quantity will make 4 or 5 patties but if you're intending to use them for breakfast sandwiches or burgers, you may want to double the recipe and make larger patties.

I had two of these patties as part of my main meal today. I enjoyed them but I think I'd like them better if they were served with a sauce or gravy. They could also be chopped or broken into crumbles and used in sauces or on pizza. 

This meatless sausage really is worth trying. I've printed it out and added it to my recipe binder. I'm sure I'll make it again and again.


Friday, 4 March 2022

Seven Budget-Friendly Ways To Stay Fit


When my brother and sister see that I've ventured to write a post about fitness they'll get a good laugh out of it. They're both very athletic and exceptionally fit. I, on the other hand, am the least athletic person I know. I'm clumsy, have a poor sense of balance, and my hand eye coordination is terrible. I'm short and brick shaped. I'm also terribly self conscious about all of that so I have a strong dislike of participating in group fitness activities. 

It's taken me years - decades in fact - to understand that there's a difference between athleticism and fitness, but I do get it now. If I don't keep my muscles strong and maintain some ease of movement, my quality of life will be diminished. I need to be able to lift and stretch and bend and pull and climb stairs and walk with sufficient ease to accomplish the day-to-day activities and chores that will allow me to live independently. That's my fitness goal. Your fitness goals may well be very different from mine but, whatever they may be, they'll be a lot more attainable if you can manage them without straining your budget.

If you're living on a limited income, many fitness activities can seem - and in fact are - unattainable. It's unlikely you'll be able to afford a Nautilus or Peloton or Nordic Track, or to engage in sports that require a lot of specialized equipment, or to pay ongoing fees like lift tickets or gym memberships, so let's focus on what you can do.  Here are seven activities that won't break your budget.

Calisthenics

Calisthenics is a system of repeated movements that use a person's own body weight as a means to improve co-ordination and flexibility and build strength. I'm pretty sure most of us remember them from school gym classes: Push-ups, jumping jacks, sit-ups and the like. They're top of my list because they require no specialized equipment or clothing other than garments loose enough or stretchy enough to allow for ease of movement. If you're doing calisthenics indoors, you don't even need shoes. 

(I do use a yoga mat when doing floor exercises but that's purely optional.)

There are lots of free calisthenics instruction videos on You Tube. If you choose to use them it's a good idea to watch them all the way through a couple of times before trying the exercises yourself. Paying attention to foot placement, body alignment, and breathing can help prevent injury and enable you get the most benefit from your efforts.

Free Access Workout Equipment in Parks

While this isn't available everywhere, many public parks have an area with fitness equipment that can be accessed and used for free. Check your parks authority website to see if this option is available near your home and, before you begin using the equipment, read the posted instructions.

Yoga

Although there's a huge industry built up around yoga clothes and yoga studios, you don't need to buy into it. You don't really need any specialized gear other than a yoga mat. As with calisthenics, your clothes should allow you freedom of movement. If you wear shoes while doing yoga, the soles should be of a kind that will keep your feet from slipping while you're exercising.

There are free yoga videos on YouTube but I opted instead to pay for online instruction. I purchased a couple of courses from Better 5 and found them very helpful.  If you choose to pay for on line instruction, take into account your level of fitness while shopping for something that works for you. It's best to choose a course that will allow unlimited access, without an expiry date. 

(I've mentioned Better 5 because their courses are designed with my age group in mind. The instruction is clear and the pace appropriate to my abilities. I don't receive any commisions or other remuneration from them.)

Stair Climbing

If you live in a multi-story apartment building like I do, stair climbing is always an available activity but even if you don't have access to indoor stairs at home you can find stairs in lots of other places. I seek out outdoor public stairways in hilly areas near where I live. They're often incorporated into paths between residential neighbourhoods, and into park or beach access trails. You can also do your stair climbing in multi-floor public buildings. The only equipment needed is comfortable clothing and suitable shoes.

Walking

Another affordable exercise, walking requires nothing more than comfortable, weather appropriate clothing and some footwear.

If you're making walking a regular part of your fitness routine, I do think you should get the best pair of shoes you can afford because arch supports and good soles can help prevent injury.  I totally get that the best you can afford may be second hand or the least expensive pair from Walmart but, whatever you can manage, it will help if you do your best to ensure a good fit. 

Other items I find helpful in keeping to my walking routine are waterproof shoes for rainy days or muddy trails, (It's a Wet Coast thing. Trails here are muddy for 8 months out of 12.), an umbrella for wet days, a warm hat and gloves for winter weather, a pedometer (basic mechanical pedometers are quite inexpensive), and - if I'm on rough footing - a walking stick. 

(I cut the branch I use for my walking stick from a fallen tree while out hiking one day. I brought it home, removed the bark, and sanded it smooth but it worked perfectly well before I did all that.

If you're going to be hiking alone or going out on a trail that's rough or not often traveled, be sure to let someone know your planned route and arrange a check in time to let them know you've returned safely. Take along a day pack with water, some protein bars (they can be made inexpensively at home) or GORP (Good old raisins and peanuts), a small first aid kit, two days' worth of any meds you require, and one of those lightweight silvery emergency blankets. If you can't afford a day pack and its contents it's best to stick to shorter walks on well trafficked, groomed trails near where you live. 

If you have a smart phone, you can download the free version of the AllTrails app. It's a great resource for finding out about trails near you. Trails are described, mapped, the distance given, altitude changes graphed, and busy times noted. AllTrails can help you make informed choices before trying new routes. 

(As with Better 5, I'm recommending AllTrails because it works well for me. It's not a paid endorsement.)

Community Sports Centers

Even if you pay the full price of admission, community fitness centers and pools are usually less expensive than private gyms and many offer free or subsidized access to people with low incomes. Where I live, that subsidy can include free admission to the pool and gym, and participation in a set number of drop in classes. 

If you're a person who prefers group activities this is an excellent option, well worth checking out.  There's an application process but it's usually pretty straightforward. 

If you receive subsidized access to community sport center facilities and programs, you'll still need to provide some gear. Depending on the activities you choose, you may need a swimsuit and towel, shorts or sweatpants, a t-shirt or sweatshirt, and athletic shoes. 

Cycling

I debated about adding cycling to my list because, if you allow it to be, cycling can be really expensive but with care it's possible to keep the costs in check. A bicycle can be counted as transportation too, especially if your budget doesn't extend to owning a car. 

Begin by learning how to ensure that the bike you buy is a good fit for your height, then shop for a used one. Local buy and sell sites and local sales groups on Facebook are often good sources for affordable used bicycles. 

You'll also need to buy a helmet and a bike lock, and you'll need to replace your helmet if ever it protects you during a fall. Even if there's no visible damage to your helmet, a fall that results in a helmet strike can impair its structure, preventing it from providing adequate protection in future. 

If you balance it against the cost of driving, maintaining, and parking a car, or even the cost of public transit, I think you'll find that an inexpensive used bicycle, together with its helmet and lock, soon pays for itself.


I'm sure there are lots of other activities that could be added to this list. If you have suggestions to share in the comments, I'd love to hear your ideas.

Friday, 11 February 2022

Simple Does It: A Clever Tip For Packing Lunches

When I first moved into a building for seniors I wondered how I would like it.  I'm one of the youngsters here. Many of my neighbours are twenty or even thirty years my senior. I've come to love it though. My neighbours are a sociable bunch and, because most of us are living on fixed incomes, happy to share any tips and tricks that help make the most of what we have. There's a lot to be said for knowledge gained through life experience. 

I don't buy individual fruit cups but my across-the-hall neighbour does. She also regularly attends Elder College classes and volunteers at the museum and one of the local seniors' drop in centers. She's a busy woman! And because she takes packed lunches with her to these activities she shared a handy tip with me. She passed on some empty fruit cup containers too.

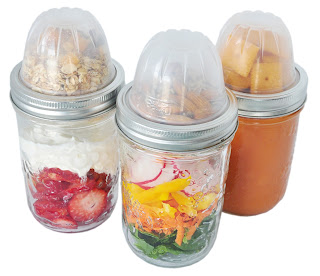
Did you know that those little plastic containers' rims are the perfect size to fit under a wide mouth Mason jar ring? I didn't either, but they are.  😊  My neighbour uses them to keep things that will be eaten together but don't store well in the same container - like salad and croutons, yogurt and granola, soup and crackers - conveniently packaged together in the soft sided cooler she uses as a lunch bag. 

It works like this: 

Fill your repurposed fruit cup with whatever ingredients you want to keep in there and then cover the top of the fruit cup with a Mason jar lid, seal-side-up.


Holding the sealer lid in place atop the cup, invert it and place the cup and lid sealer-side-down onto the top of your jar. Secure it in place with the Mason jar ring. 

Easy peasy, right? I wouldn't recommend it for kids' lunches but for adults taking lunch to work or school it's brilliant. 

I'll pass your thanks on to my neighbour, shall I? You're welcome.  😊

Friday, 4 February 2022

Krispies And Candies Cookies


A lot of the best stuff I make comes from me surveying my fridge and pantry, then going with what I have on hand. These cookies are like that.

I had a jar of mini M&M's that had seemed like a good idea while I was at Bulk Barn but not such a good idea when I got home. They sat there on my shelf looking all bright and cheerful and useless until I decided I had to use them up. And cookies are good, right? Pretty much any kind of cookie is a happy thing.

So...What did I have to put in the cookies along with the M&M's?  I could've gone with nuts of some sort, but I had none and I didn't want to buy anything more. I did have Rice Krispies because I always have Rice Krispies. So, that's what I went with.  

The finished cookies were surprisingly good. The coating on the M&M's and the crispy cereal gave them a pleasant crunch that made my mouth really happy.

If you'd like to make these cookies, you'll need:

  • 2-1/4 cups all purpose flour
  • 1 teaspoon baking soda
  • 1 teaspoon salt
  • 1 cup butter
  • 3/4 c each white sugar and brown sugar, lightly packed
  • 2 beaten eggs
  • 1 teaspoon vanilla extract
  • 2 cups mini M&M's
  • 4 cups Rice Krispies
Use a fork or a whisk to stir together the flour, baking soda, and salt.

In another, large, bowl, cream together the butter and sugars. 

Add in the beaten eggs and vanilla and mix them until they were well combined with the creamed butter and sugars. Beat them together until they're light and fluffy.  The batter may look slightly curdled - broken - at this point. 

Mix the flour/baking soda/salt mixture into the wet ingredients until all of the ingredients are mixed into a stiff dough.

Add in the M&M's and Rice Krispies. Use a wooden spoon to mix them into the dough as gently as possible. Some of the Rice Krispies will get broken in the process but enough will stay intact to give the cookies good texture.

Form the dough into 1-1/2 to 2 inch balls and place them 2 inches apart on parchment lined cookie sheets.

Bake the cookies at 350F for about 12 minutes, until they begin to take on colour around the outside edges. 

Cool the cookies on a baking sheet for about 5 minutes and then transfer them to a rack covered with a sheet of brown paper to cool to room temperature. (The brown paper will absorb any extra moisture or butter from the bottom of the cookies, helping to ensure a crisp finish.)

Once the cookies are coooled to room temperature, store them in air tight containers and use them up within a few days.  If you need to keep them for longer than that, put them in the freezer.

Friday, 21 January 2022

Why You Need This Stuff In Your Kitchen: Chickpea Flour


One of the hard realities of living on a limited food budget is that the less you have to spend, the fewer foods you have to choose from.

My home is on Vancouver Island, off the southwest coast of Canada. It's an expensive place to live and I'm on a fixed income, in a time of rapidly increasing inflation. I could choose to move somewhere with a lower cost of living but I've lived here almost all my life. My friends and family are here and I don't want to be further away from them. 

That leaves me with two choices: I can either cut a discretionary expense like internet or my car out of my budget and put the money saved toward buying food, or I can accept that my range of food choices is declining and figure out how to make the best of what I do have access to.  I've chosen the second.

Meat is incredibly expensive here right now so it's making fewer and fewer appearances on my plate and I'm okay with that. I'm an adept enough cook and know enough about basic nutrition to ensure that I get sufficient protein in my diet from other sources. I still include eggs and cheese in my diet but I also rely on nuts, seeds, whole grains, and legumes.  Especially legumes.  

If you look to other cultures that rely heavily on plants for the proteins in their diet, you'll soon see that beans, lentils, and peas play an important part in their cuisines. They're inexpensive, have an extraordinarily long shelf life, and - when well prepared - they taste good too. Dried legumes are often consumed in whole form, re-hydrated and cooked until tender, but they're also often ground into pastes or flours and added to dishes in these forms.

Chickpea flour is a cooking staple in India, and also found in Mediterranean and African cuisines. As the vegan lifestyle grows in popularity chickpea flour is seen more often in North American cooking too.  It's versatile and rich in nutrients. One cup of chickpea flour contains 20 grams of protein, 6 grams of fat, 10 grams of fiber, 30% of the recommended daily intake of thiamine, 101% of the recommended daily intake of folate, and 25% of the recommended daily intake of iron.

There are 2 commonly available forms of chickpea flour in the stores here: white chickpea flour/gram flour and besan flour, which is made from brown chickpeas and more finely ground. Both are similar in nutritional value. There are differences in the way they're cooked though. Vegan Richa wrote an excellent post about the differences between chickpea flour and besan. It's worth clicking through to read it. 

When you're cooking with chickpea flour, don't taste the raw batter. It'll taste awful and leave an unpleasant aftertaste too. When cooked, the flavour mellows into something slightly nutty and toasty; very pleasant.

I use chickpea flour in several ways:  

  • I sub it for half of the wheat flour in conventional baking powder or baking soda leavened recipes for pancakes, biscuits, cookies, etc. (You'll probably have to adjust the amount of liquid you add.)
  • I use it in Indian recipes, as instructed by the recipe writer.
  • I use it to make something akin to polenta, which I cool, then cut into pieces and use in a variety of applications. It can be used as a substitute in recipes that call for paneer or tofu, it can be cut into wedges or fries and baked, fried plain, or battered/breaded and then deep fried.
  • I make it into a thin batter - sometimes leavened and sometimes not - and cook it as I would crêpe batter, for use in place of tortillas.

There are a host of chickpea flour recipes on Pinterest. Pop on over there, take a look, and then give some of them a try. I'm sure you'll find something you like and, in doing so, you'll add variety and nutritional value to your menus while stretching your food dollars further.


Sunday, 9 January 2022

Affordable Eats: Homemade Oat Milk


Have you looked at prices in the grocery store lately?  I don't know about where you live, but here the price of everything is going up. 

I'm on a fixed income so when prices rise the only option I have is to change my spending habits. More and more things are being struck from my grocery list because I simply can't afford them.  Dairy prices are rising so yogurt is no longer on my shopping list and cheese is appearing on my table far less often. Milk prices are going up and nut milks, soy milk, rice milk, and oat milk have always been more expensive than cow's milk. Even so their prices are rising too.

Recently, I tried oat milk and found that it agrees better with my digestion than cow's milk or other non-dairy options so that's what I've been buying for the past couple of months. In addition to being kind to my tummy, oat milk contains fibre, iron, calcium, potassium, and B vitamins. That's some good nutritional value. Still, the cost...

While browsing Pinterest just before Christmas, I came across this post from Alpha Foodie. It looked easy to make and it would cost me pennies on the dollar in comparison to the stuff in the dairy case. I gave it a try and it worked so well I'm sharing it with you. Seriously, you need to make this. It tastes good and it'll save you money too.

Here are some notes based on my own batches:

I go for the "handful of soaked cashews" option because it gives the oatmilk a creamier consistency. Even with the cashews it's a lot less expensive than store bought.

I use unsweetened oat milk when cooking. If I'm drinking it as a hot beverage, I either sweeten it with maple syrup and add a little vanilla extract, or I use a Torani coffee syrup. Jenni Field's Pastry Chef Online's butterscotch coffee syrup is mighty fine too. 😊

If you choose to add the ingredients for any of the flavour variations listed in the post, you'll still save money over store bought.  

If you prefer the mejool date option to using maple syrup, you can use (less expensive) regular dates from the baking aisle instead, by soaking them in warm water then letting them cool to room temperature before you add them to the oat milk.

I hope you'll give this a try. It's a good budget stretcher.