Wednesday 3 December 2014

Pork and Ale Stew With Cornbread Dumplings


Have you noticed the price of meat lately?  Jeez Louise it's getting expensive!  It's sure brought about some changes in how we eat at our house.  

Less and less meat is making its way to our dinner table and, when it does, we're apt to stretch it out with lots of veggies to make it go further.  We also find ourselves eating more pork because it is much less expensive to buy than beef.  

When we do buy meat, we often buy large cuts and then break them down into smaller portions ourselves.  Whole boneless pork loins from Costco are good for this.  The price per pound is more reasonable than that of many other cuts of meat and, because they're very well trimmed, there's almost no waste.  There is, however, a section of the pork loin that is much darker meat than the rest, and has some gristle running through it.  I trim that portion into stew meat and use it in braising recipes.  It formed the basis for this stew.

You'll notice that I used beer in this recipe  Although we don't drink beer, I do enjoy cooking with it.  It's not as inexpensive as stock or water, but worth the investment because of the flavour it brings to the dish.  I keep the cost down as much as possible by buying beer from the single bottle rack, where bottles salvaged from broken cases are sold at a reduced price.

Here are the ingredients for the stew:


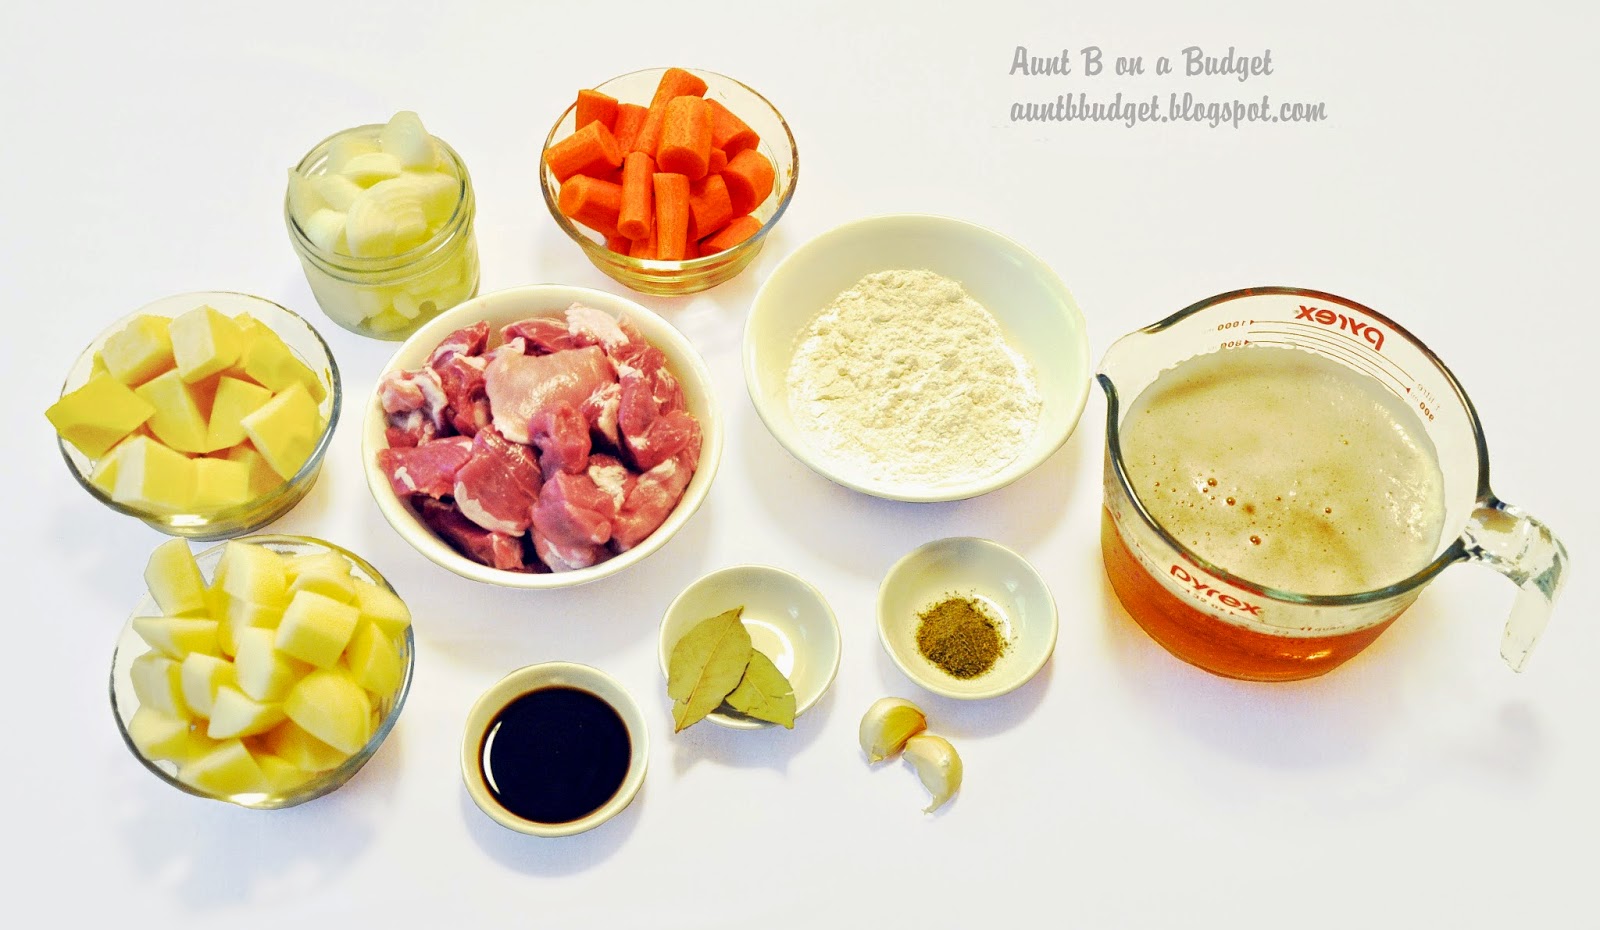
  • 1-1/2 pounds cubed pork loin
  • 1-1/2 cups all purpose flour
  • 1 teaspoon poultry seasoning
  • salt and pepper to taste (Be really generous.  Not all of it is going to end up on the meat and you want a good flavour base.)
  • 2 to 4 Tablespoons of bacon fat (or cooking oil if you prefer)
  • Boiling water
  • 3 cups of pale ale (I've used darker beers for this too but wouldn't go much darker than an amber because of the delicate flavour of the pork)
  • 2 cloves of garlic
  • 1-1/2 to 2 cups each of onions, carrots, rutabaga (yellow turnip), and potatoes, cut in a 1-inch dice* 
  • 1 Tablespoon Worcestershire sauce
  • 2 bay leaves
  • 1 to 2 Tablespoons cornstarch (optional)


To make the dumplings, you'll need:


  • 3/4 cup cornmeal
  • 1 398 ml/14 ounce tin of creamed corn
  • 1/4 cup sunflower oil
  • 1 egg
  • 1 cup all purpose flour
  • 3-1/2 teaspoons baking powder
  • 1 teaspoon of salt
  • 1/2 cup chopped green onions
  • 1 or 2 finely diced jalapeno peppers (optional)

Begin by dredging the pork in seasoned flour.  I do this by pouring the flour, poultry seasoning, salt and pepper into a large brown paper bag and giving it a good shake to mix it up. Once the flour is seasoned, I add in the pork pieces and give the bag another good shake.  I transfer the dredged pork onto a plate, shaking any excess flour back into the bag.

Once the pork is dredged, melt the bacon fat in a large Dutch oven and begin searing the meat.  Work in stages, browning a few pieces at a time, being careful not to overcrowd the pan.  


The seared pork should be golden brown and have a crisp coating that resembles the outside of a piece of fried chicken.


When the meat has all been browned, return it to the pan and pour the beer over it.  Stand back when you do this:  The beer will bubble up and spit a bit as it hits the hot pan.


Add in all of the remaining ingredients, together with just enough boiling water to bring the liquid level high enough to almost cover the meat.

Bring the pot to a boil, then turn the heat down to a low boil - just a little above a simmer. 


Cover the pot and leave the stew to cook for about an hour. You'll need to stir it now and again to ensure that everything cooks evenly.

When the stew has cooked for about an hour, it's time to make the dumplings.  

Begin by stirring together the creamed corn and cornmeal.  

Beat the egg and add it to the cornmeal mixture, along with the oil. Stir until well combined.

In a separate bowl, whisk together the flour, baking soda, and salt. 

Add in the chopped green onions, and the jalapeno if you're using it, and toss them through the flour mixture so that they're lightly coated.

Add the flour mixture to the cornmeal mixture and stir just until the dry ingredients have been moistened.  The batter will be lumpy.


Take a look at the stew and give it a taste.  Adjust the seasoning as needed.  

If the gravy is not as thick as you'd like, you can make a slurry of cornstarch and a little cold water and mix it in. The gravy will thicken as the stew returns to a low boil.


Once the seasoning and thickness of the stew are where you want them to be, spoon dollops of the cornbread batter onto the top of the stew.


Put the lid on the pot and walk away.  Leave it undisturbed for 25 minutes.  Don't lift the lid!  

The cooked dumplings will have increased in size and have a very tender texture.


When the dumplings are cooked, use a slotted spoon to remove them to a plate.  Portion out the stew, then place a dumpling or two on top of each serving.


There will probably be some dumpling batter left over.  I usually pour it into an oven safe casserole dish and bake it at 400F for 20 to 25 minutes, then save it to serve at breakfast the following day.  

This time, because our oven was broken, I cooked it in our microwave, on the high setting, for 5 minutes.  It wasn't as light as it would have been if baked in the oven, but it still made a fine accompaniment to our morning eggs.


Frugal Tips:  

Don't waste even a bit of flavour or nutrition from your vegetables. Scrub your carrots, rutabaga, and potatoes well before peeling them, then peel them directly into your stock pot.  

If you prefer not to put potato peels in your stock, they can be used to make a tasty, crispy snack or garnish.  Keep them in the fridge, covered in cold water, until you're ready to use them. Carefully pat them dry, then fry them in 360F oil until crispy and golden. Use a spider or slotted spoon to scoop the cooked peels from the oil, placing them a paper-towel-lined bowl.  Season them immediately, with salt and pepper, tossing them in the bowl to distribute the seasoning evenly. Add extra flavour with any of the following:  Chili powder, smoked paprika, curry powder, or garam masala.

Wednesday 12 November 2014

ReVision: The Christmas Card Project


We make charitable donations throughout the year but at Christmas-time we like to do a little extra.  Some years, when paycheques are regular, that something extra is as easy as writing a cheque to the Food Bank.  Other years, it's more challenging.

This year falls under the heading of challenging.  

Don't get me wrong:  We have enough.  There's food in the pantry and the essential bills are paid.  It's just that, because of a change in our circumstances, we've had to give up many of life's little extras.

Charitable giving doesn't fall under the heading of extras for us, so we're thinking creatively about how to help out this year. We've been looking to the resources we have on hand, and finding ways to use them for our donations.

In my craft room, there's a big box of Christmas cards, saved from previous years.  I love to save them because I can use them for so many things, and my family and friends save cards for me too. I got to thinking about those Christmas cards and they gave me an idea:

Many of us are now falling out of the habit of sending Christmas cards but our elders, who value getting handwritten letters and other gifts in the mail, still enjoy them. For them, Christmas cards are a way to touch base with distant friends and family and to let those nearer at hand know that they're in their thoughts during the holiday season. 

Sadly, with the costs of everyday necessities rising rapidly and the cost of Canadian postage having more than doubled in the past year, many seniors can no longer afford to send holiday greetings.  I thought it might be nice to use some of the old cards in my stash to make new cards I could give them. 

Here's what I used to make the cards:
  • Salvaged greeting cards
  • Craft foam sheets
  • Coloured card stock (65 lb. weight) (I buy bulk packs when they go on sale at Michael's.)
  • White card stock (120 lb. weight).  I buy it in a bulk pack from a local office supply store.  It's a staple in my craft room because it's much less expensive than individual sheets purchased at a scrapbooking store.
  • A self-healing cutting mat (If you don't have a mat, a thick piece of cardboard would work too.  You just want something that will protect your work surface from cuts and scratches.)
  • An X-acto knife
  • A small pair of scissors
  • A cork backed ruler
  • A sharp pencil 
  • A glue stick
  • A metal knitting needle or bone folder, for scoring fold lines
  • Ribbon scraps
  • My computer and printer

I began by trimming useable pieces from my stock of cards.  I cut off card fronts, salvaged printed greetings where I could, and also saved little postage-sized-versions of the cover illustrations from the backs of some of the cards.

Once I'd finished salvaging what I could, I went through the images to decide which would be best for the format I'd chosen.  

Because I wanted to craft many cards in a short time, I chose to make each finished card the same size: 4-1/4 by 5-1/2 inches. It's a frugal use of materials because each 8-1/2 by 11 sheet of card stock will make two cards. 

I made simple greetings for the insides of the cards; one for cards with the fold on the side, and one for cards with folds at the top.  


I printed the greetings on plain white card stock.

Once the new white cards were printed with their captions, I began to assemble cards by making card fronts from the salvaged pieces I'd cut.  

The simplest cards I made were those where I just trimmed a larger image down to size and then pasted it in place.


On some cards, I used a single, slightly smaller image, adding dimension by mounting it on a piece of craft foam before gluing it to the front of the card.  I backed those raised images with a mat made from a piece of coloured card stock.


I fancied some of the cards up by adding a small ribbon bow.


I was able to cut several of my salvaged card fronts in half, to make two different cards.


I saved the trimmings from some of my re-used card fronts and used them as accents on other card designs.


When the images I was using were considerably smaller than the new card fronts, I mounted a piece of coloured card stock and then added one or more small components to make a new design. 


In short order, I'd assembled two dozen cards, using only materials I had on hand.  I bought nothing new at all to make them.  It gave me a wonderful feeling of accomplishment.  :)

Once the glue on my cards had dried, I packaged them individually in cellophane bags. I tucked a stamp inside each card - a little surprise for the sender - and packaged each card with an envelope. (Choosing a commonly used card size enabled me to use ready-made envelopes.) 

I sealed the card packages with Christmas stickers. Soon I'll deliver them to our local seniors' drop in centre.  They're a small gift, but I'm hoping they'll spread a little seasonal cheer.


Want to start a card project of your own?  Click here for suggestions on salvaged materials you can use.

If your cards aren't sized to fit envelopes from the store, you can easily make your own.  Click here for an envelope-making tutorial.


Thursday 17 July 2014

Last Minute Chicken Soup


You know how sometimes the day just flies by you and all of a sudden it's suppertime and you don't have a thing planned and you don't want to go to the grocery store and the budget doesn't allow for take-out?

Yeah, those days.

I had one of those recently and this is what I made: A fast, flavourful chicken soup.  It comes together quickly but is oh-so-much-more-tasty than stuff from a tin.

Here's the recipe:


  • 2 boneless skinless chicken breasts (I took mine straight from the freezer)
  • 1/2 cup finely diced onion
  • 1/4 cup sliced celery
  • 1 teaspoon grated fresh ginger (I actually used frozen ginger.  I peel it, wrap it in plastic wrap and then put it in a freezer bag.  It grates so finely that it's like snow so the flavour spreads readily through whatever you're seasoning, and tastes wonderful.)
  • 1 clove of garlic, peeled
  • pepper flakes to taste
  • 1 - 900 ml/1 quart box of chicken stock
  • 1/2 cup carrots, cut into matchsticks
  • 1/4 cup frozen peas
  • 1 cup of thin rice noodles 

Put the chicken breasts, onion, celery, ginger, garlic, pepper flakes, and stock in a large saucepan.  Bring it to a boil, then reduce the heat to a simmer and cover the pot.  

Simmer until the chicken is cooked through.  This takes surprisingly little time.  Mine cooked in about 15 minutes from the time the pot came to a boil.

When the chicken is cooked through, use a slotted spoon to lift the chicken breasts from the pot, onto a cutting board.  Remove the garlic clove too.


Cut one of the chicken breasts up 1/2-inch cubes.

Set the other chicken breast aside for another dish.  (I used mine for chicken salad the next day.)

Add the carrots to the pot and turn up the heat enough to return the stock to a low boil.  

Continue cooking until the carrots begin to get tender, but aren't cooked through.


When the carrots are starting to become tender, lower the heat to simmer again.

Return the chicken to the pot and add in the noodles and peas.  


Cover the pot and let it simmer for about 5 minutes.

Serve the soup immediately, while it's still piping hot.

Tuesday 15 July 2014

Hedgerow Berry Pancakes


When I was a little girl pancakes made an appearance on our supper table at least once or twice each month.  I know now that they were one way for my mom to stretch the food budget but, at the time, I looked forward to pancake night every bit as much as kids today anticipate pizza night.  It was a big treat.

Often our pancakes were dressed with Roger's golden syrup, spooned from a gallon tin the looked just like a paint can. Sometimes, they were served with jam.  Sometimes they were topped with a sprinkle of sugar and lemon juice squeezed from a small plastic lemon.  That was my favourite.  

I've since learned that the sugar and lemon juice was a make-do measure too.  Having no syrup or jam in the house one day, my mom offered us what was on hand.  It was such a hit with us that we continued to enjoy it for all of our growing up years.

Pancake suppers are still a treat to me, and I still like best to serve them with melty butter, a sprinkle of sugar, and a squeeze of lemon juice.  Berries pair beautifully with lemon so, at this time of year when wild berries are plentiful, I add them to my pancakes too.

Here's the recipe:


  • 1-2/3 cups flour
  • 1 Tablespoon baking powder
  • 2 Tablespoons sugar
  • 1/2 teaspoon salt
  • 1 egg
  • about 1-3/4 cups milk
  • 3 Tablespoons oil, plus more oil for cooking (I use sunflower oil)
  • about 2 cups of fresh berries, gently rinsed (I used thimbleberries and a few early blackberries this time but any berry you choose to use will work.)
  • butter for spreading on your pancakes
  • sugar for sprinkling over the melted butter
  • lemon wedges for squeezing over it all

Begin by whisking together the flour, baking powder, sugar, and salt.  

When they're well combined, make a well in the center.


Break the egg into a two-cup measure and beat it well.  


Add in enough milk to make two cups.


Pour the egg and milk into the well in the dry ingredients and add the oil.  

Mix everything together to make a thick batter.  Try not to overmix it.  The dry ingredients should be moistened but there should still be some lumps in the batter.


Heat a non-stick or cast iron pan over medium heat and add a little oil to coat the bottom of the pan. 

Ladle in enough batter to make a pancake about 6 inches in diameter.  You may want to use the back of the ladle to spread the batter out a bit.

Sprinkle some berries over the batter in the pan.

Cook the pancake until the batter begins to set up around the edges and small bubbles appear on the uncooked surface.


Flip the pancake and cook the other side.  The bottom of the pancake will look like this:


Keep the cooked pancakes warm in a 200F oven until the entire batch is cooked.  Serve them berry-side-up, with the butter, sugar, and lemon on the table so each person can dress them up the way they want to.

This recipe makes about 6 pancakes.  I usually eat two, and my fella does the same.  I often make a double batch though, because any leftover pancakes can be frozen for another day.  

Thursday 10 July 2014

How To Provide Variety In Your Menus While On A Tight Budget


A Facebook friend wrote to me recently, asking how I provide variety in our menus while sticking to a tight budget.  It's the kind of question I love to answer.  I thought you might like to read the reply I sent her (with a little added information) so here it is:

I work hard to add variety to our diet but it's taken a long time both to establish the stockpile of home canned and frozen foods that allow me to do so, and to find a way to do it affordably. With food prices going up the way they are, it's a ever-greater challenge too! 

Here are a few things that work for me: 

We shop for produce seasonally, buying what's available when it's at its best price. This applies to fresh vegetables and fruit for our table and to produce for my home canning.  

I participate in the Good Food Box program, a co-ooperative bulk buying program.  The price of the box ($10.00 here) is paid in advance each month and the money collected is pooled to purchase produce either directy from local growers or - if that's not possible - direct from a wholesaler.  The bulk purchases are then divided, packed and distributed by volunteers.  Because there is no retail mark up and there are no labour costs involved, the money spent goes a lot further than it would in a grocery store.  The photo above displays the contents of one box, purchased in December.

If I do splurge on pricey produce, I buy a small quantity and use it to accent the flavour to a dish rather than using it as the main feature in a meal.

I put away at least $75 each month into a designated account I use specifically for purchasing extra produce when it's in season. I put that food by for the long months between October and July when local produce is not so readily available and vegetables and fruit are more costly.  When our budget is tight it can be a real stretch for us to come up with the extra money needed for the preserving account, but it's important enough to us that we're willing do without other things in order to do so.

We have at least three, and more often four or five days each week, when we don't eat meat. It's a big ticket item in our grocery stores. Even when they're pricey, vegetables and fruit are almost always a less expensive alternative than meat. Our meatless meals do still contain proteins: either plant based (beans, nuts, seeds, and pulses), or eggs and - in moderate amounts - cheese.

I try to buy the meat we do eat on sale, and to discount the purchase further by using coupons. Meat coupons are almost never available here but I buy the gas needed for my commute to work at the gas bar of a local grocery store. They issue $0.05 in coupons for every litre of gas purchased.  I use those coupons towards my meat purchases.

I forage for wild food regularly, even during the winter months. This area has an abundance of edible plants and I gather clams, oysters, mussels, and limpets from the shore. Depending upon the time of year and where I'm foraging, I can also gather kelp and other edible sea plants. 

It often costs less to cook in larger quanitites so, even though there are only two of us in our household, I usually cook more than I need for a single meal.  I freeze or can the leftovers for future meals, or use them as ingredients in new dishes over the following days.

My gardening options are limited because I live in an apartment, but I do grow herbs, salad greens, carrots, radishes, beans, and tomatoes on my balcony and windowsills. During the winter months I also grow sprouts to use in place of expensive out-of-season salad greens.

I prepare almost all of our baked goods at home and, 
to help keep the costs down, I buy my flour, sugar, and yeast in large quantities at Costco or from a bakery wholesaler.

We are blessed to have family and friends who hunt and fish. Sometimes I trade home baking for a portion of their catch.

Perhaps most important to keeping our budget in line, I'm an absolute bear about waste. 
In order to reduce the possibility of spoilage, I buy produce for our table in small quantities as we need it. I label and date everything that goes in the freezer and pantry, and I keep an inventory so that what we have on hand is used in a timely fashion. Leftovers are treated as an opportunity to make new dishes. Our lunches are planned around leftovers and many of our main dishes too. We work very hard to use up every bit of food we have. If you're discarding food, you might just as well thow your money directly into the bin and save yourself the effort of shopping. 

I hope this is of some help to you. Many smart, frugal cooks participate in the "what's for supper" string on my Facebook page too. They share lots of helpful ideas.  Do stop by for some inspiration, and to share ideas of your own.  We love it when new voices join the conversation.


Tuesday 8 July 2014

Oatmeal Raisin Cookies

We all have foods that say "comfort" to us.  For some it's tomato soup and grilled cheese sandwiches. For others it's pasta.  A friend of mine makes soft boiled eggs and toast soldiers when she's feeling sad.  

When he's looking for comfort food, my fella wants oatmeal raisin cookies. They speak to him of his mother's kitchen, of after school snacks, and of a warm seat by the wood stove on a rainy day.

Oatmeal raisin cookies do have a lot going for them:  a nice soft texture, given a little chew from the oatmeal, iron rich raisins, B-vitamins and protein from the oats, and the delicious aroma of old fashioned baking spices.  

I use the soft oatmeal cookie recipe from "The Fanny Farmer Baking Book" by Marion Cunningham, but without the nuts or the milk.  It's a simple cookie to make, and inexpensive too.  My guy loves 'em.

Here's the recipe.  You'll need:


  • 1 cup raisins
  • 1/2 cup butter
  • 1 cup sugar
  • 2 eggs
  • 1 teaspoon vanilla extract
  • 1/4 cup water reserved from soaking the raisins
  • 1-1/2 cups flour
  • 1/2 teaspoon baking soda
  • 1/2 teaspoon baking powder
  • 1/2 teaspoon salt
  • 1 teaspoon cinnamon
  • 1/2 teaspoon allspice
  • 1-1/2 cups oatmeal (not instant)


Begin by soaking the raisins.  Put them in a heat proof cup or bowl and cover them with boiling water.  Soak them until the water cools to room temperature, then drain them, reserving 1/4 cup of the soaking water.


When the raisins are ready to go, make the cookie batter.

Cream the butter and sugar together.


Crack one egg into a cup or small bowl and beat it, then mix it into the butter and sugar mixture.  Do the same with the second egg, then mix in the vanilla and the water you reserved from soaking the raisins.


In a separate bowl, whisk together the flour, baking soda, baking powder, salt, cinnamon, and allspice.  

Add the oats and stir them through the flour mixture with a fork.


Add the flour and oat mixture to the butter, sugar, and egg mixture. Stir until the ingredients are well combined.

Add in the raisins and stir them through the dough.


Drop spoonfuls of cookie dough onto parchment lined baking sheets, spacing the cookies about 2 inches apart.


Bake the cookies on the middle rack of a 350F oven for about 12 minutes, or until they're set and lightly browned on the bottom.


Transfer the cookies to a sheet of brown paper to cool.

I buy rolls of brown paper at the office supply store for just this purpose.  (You can find them in the mailing section.)  The paper absorbs any excess oil that may be on the bottom of the cookies, resulting in a nicer texture once they are cooled, and it's compostable.


Store the cooled cookies in an airtight container.  They freeze well but do pack them with wax paper between each layer to prevent them from sticking together when they thaw.

Monday 7 July 2014

Fifteen Things To Gather Now For Giving Later

I gather wild food from all around our area, all year 'round.  It's a rare thing for me to go for a walk without a bag or a basket in hand for gathering as I go. At this time of year, food is especially abundant but there are other things to forage for during the summer months too. You can gather all sorts of natural materials to use for gift giving later in the year.


While at the beach, look for
shells and shell fragments to make into jewelry and wind chimes,


pebbles to make into jewelry,


beach glass to make into jewelry, sun catchers, and wind chimes,


and seaweed to press for use on greeting cards.


While hiking, look for
berries to make into jams and jellies, 


chicory, so you can dry the roots and 
grind them together with your favourite beans 
for your own New-Orleans-style coffee blend,


fireweed flowers to dry and use for herbal teas and jelly,


Queen Anne's lace and other wildflowers and foliage to press and use on greeting cards,


pearly everlasting for using on wreaths and in dried flower arrangements,


fallen branches to use for basket handles, coasters, and buttons,


and cones for making wreaths, Christmas decorations, and fire starters. (Conifers drop their cones at this time of year, as do alder trees. They can be gathered well into fall but are at their cleanest and driest right now.)


While you're enjoying your garden or walking around the neighbourhood, you can gather 
(always with permission, of course)
lavender to mix with Earl Grey tea, to use in herbs de Provence, to make sachets, and to make scented water for spraying on linens and clothing while ironing,


hydrangea heads for dried flower arrangements,


flowers and foliage to press and use on greeting cards,


and seeds you can package in homemade envelopes.