Tuesday, 22 May 2012

Puffy Omelette with Cheddar and Chives


When thinking about cooking on a budget, I find myself harking back to recipes I learned in college or as a young bride.  I’ve learned a lot since those days (I’m certainly a more accomplished cook than I was then) but, when I’m faced with a challenge that requires frugal living it’s those early dishes that come to mind. The lessons we learn about thrift as young adults are usually hard-earned, and they tend to stay with us for life.  In middle age I find that my mind often travels along those long-familiar paths, and I find reassurance in revisiting skills I know to be useful.

This recipe dates back to my first years out on my own, while I was in secretarial school:

I had only three eggs in the fridge, a few carrots, some onions, and no money in my bank account with which to buy more food.  Supper was looming large on my mind.  What could I make for two people with so little on hand?

A school chum came to the rescue, teaching me how to make those three eggs into a beautiful, puffy omelette; turning almost nothing into really something.  Paired with a salad of shredded carrot and onion, we felt like we were dining at the Ritz!

I haven’t seen my school chum since we finished the course but I think of her every time I make this dish.  It has become a staple at our house and I remain grateful to her for her kindness in sharing it.  It’s delicious whether made just with eggs, salt, and pepper, or with whatever amendments we happen to have on hand.

Yesterday I made a puffy omelette for supper, flavoured with cheddar cheese and chives.  It was a pretty dish, inexpensive to make, and perfect for our Meatless Monday meal.

I made an omelette for two.  If you’re feeding more than two people, increase the number of eggs by two for each additional serving.  Up to six eggs may be used in a single, large pan but if you are using more than that, I’d recommend making two omelettes, in two separate pans.

To make a Puffy Omelette with Cheese and Chives, you’ll need:


  • 4 eggs
  • 1 to 1-1/2 cups shredded sharp cheddar cheese
  • 1/3 cup chopped chives
  • A little butter or oil for the pan
  • Salt, pepper, and/or whatever other seasonings you care to add

Begin by separating the eggs. 

Put the yolks into a medium-sized bowl and beat them.  Add in the cheese and chives and stir so that the yolks coat them.  It will not look like enough liquid, but it is.  Don’t add more.


Whip the egg whites until they’re very stiff.


Take about 1/3 of the egg white and fold it into the egg yolk, cheese, and chive mixture.  Try to be gentle, and to avoid collapsing the whites any more than you have to.  It’s okay if a few streaks of unincorporated white remain.


Fold the mixture with the egg yolks in it into the remaining egg whites, again retaining as much volume as possible.


Place a 10-inch non-stick pan on medium heat.  (If the pan’s handle is not oven safe, you should wrap it in foil.)  Turn on your broiler.

When the pan is hot, melt in a little butter or add a small amount of oil.  Turn the pan so that the butter or oil coat the bottom and sides of the pan.

Turn the omelette mixture into the pan, spread it out into an even layer, and season it.  Leave it on the heat just until the bottom of the omelette is set.


Transfer the omelette to under the broiler, keeping it some distance from the flame or broiler element.  I place mine on the middle rack in my oven.)  Allow it to brown (Watch it carefully!) then turn off the broiler and leave the omelette in the oven’s residual heat until the middle dries and sets.


To serve the omelette, you can either fold it in half and then serve one half of the folded omelette to each person or you can do as I do, cutting the omelette into quarters and stacking two quarters on top of each other on each plate. 


Gallery of Favorites  


Addicted to Recipes Button, Page button  


Mrs Happy Homemaker   Full Time Mama   Tuesday To Do Party  

Tempt my Tummy Tuesdays   Cast Party Wednesday  

  Photobucket   A Little Nosh

Monday, 21 May 2012

Infused Vinegars


Chive flowers are in bloom right now and I've noticed a lot of posts on the various Facebook pages I follow about using them to infuse vinegars.  I love chive blossom vinegar too.  A simple-to-make pantry staple, it's one of my favourite salad dressing ingredients. 

I wrote a piece about infused vinegars last year, for A Word from Aunt B.  I thought this would be a good opportunity to share it again, with some amendments and some photos of the chive flower vinegar I made this weekend:


Infused vinegars form part of my pantry every year.  They add flavour to my salad dressings and marinades year ‘round, and they’re easy and affordable to make.  

I infuse my vinegars with fruits, herbs, garlic, onion, roasted red peppers, tomatoes, edible flowers - whatever suits my fancy and seems likely to work well with my recipes.  I try to keep it simple; one, two, or at most three flavours in a single blend. 

I use whatever vinegar I think will work best with the flavours I’m infusing.  I like red wine vinegar with cherries, and red or white wine vinegar with herbs.  I sometimes use rice vinegar or cider vinegar in my infusions, or even the plain white vinegar you buy in big jugs for pickling.  I rarely use malt vinegar.
 
(The vinegar shown in the photos is made with chive flowers, thyme flowers, and rice vinegar.  White or red wine vinegar would work very well with these ingredients too.)  

When making infused vinegars, I work in small quantities because I prefer to have a variety of different flavours on hand rather than a large batch of one single flavour.

As with any form of preserving, there are a few basic food safety rules to follow when making infused vinegars.  Please keep food safety in mind.  It’s always better to be safe than sorry.

Use glass containers for your infused vinegars. 

If you re-use containers from the grocery store that can't be processed in your canner, your vinegars must be stored in the fridge. 

Always check the containers you're using for chips and cracks.  If they're damaged discard them. 

Begin by sterilizing your containers.  Wash them in warm, soapy water and rinse them well.  Place the containers in a large kettle and cover them with cold water.  The water must cover the containers completely, with at least 2 inches of water above the containers’ highest point.  Bring the water to a boil and boil the jars for 15 minutes.  Keep them in the hot water, held at a simmer, until you are ready to fill them.

If you are using proper canning lids and intend to process your vinegar for storage in your pantry, prepare the lids according to the manufacturer’s directions, as provided on the package. 

If you’re re-using containers and will be keeping your vinegar in the fridge, sterilize the lids in boiling water, right along with the jars.

While the jars are being sterilized, wash the ingredients you will be using to flavour your vinegar. 

Large fruits or vegetables should be coarsely chopped or sliced so that they will fit into your containers and so that they more easily release their flavours into the vingear. 

There are no hard and fast rules about proportion when making infused vinegars.  If you’re using herbs, garlic, or onions, their strong flavours require that only a small amount be placed in each jar.  A single clove of garlic will flavour a pint of vinegar.  Likewise a couple of tablespoons of fresh herbs will do the job. 

Fruits and things like roasted peppers or tomatoes are more mild in flavour and will require more volume in proportion to the vinegar.  I like to fill the jar about a third full with these ingredients. 


When the containers are sterilized, place your prepared infusing ingredients in the jars or bottles and pour vinegar over them.  Wipe the rims of the jars clean with a damp paper towel and then put the lids in place.

If you are re-using containers from the grocery store, allow the jars to cool, transferring them to the fridge as soon as they've reached room temperature.

If you’re putting the vinegar away in canning jars for storage in your pantry, process the jars in a boiling water bath for 10 minutes to seal them.

All food put by in jars benefits from being stored in a cool, dark place. 

Infused vinegars need to rest at least a couple of weeks in order to develop their flavours.  The longer they rest, the better their flavours will be. 

Once you’ve broken the seals on your jars, infused vinegars should be stored in the fridge, just as you would store pickles.

The flavours infused vinegars add to your dishes are definitely worth the effort you invest in making them.  Have some fun experimenting with your own flavours.  Enjoy the results.
________________________________
This post is linked to Hearth & Soul Blog Hop hosted by Premeditated Leftovers, The 21st Century Housewife, Elsa Cooks, Penniless Parenting, Savoring Today, and Zesty South Indian Kitchen.
Hearth & Soul Hop

Friday, 18 May 2012

Beetski Salad


My friend Anna is the goddess of square meal cooking.  She has a compendium of recipes from back in the day, all fairly simple and all very tasty.  She learned much of her cooking from her mom, and has been kind enough to share many of those recipes with me. 

Some years ago, Anna bought a cookbook called “Square Meals.”  It was very cool; a collection of recipes from the 50’s and early 60’s, with humourous commentary and vintage illustrations.  I spent some hours reading through it, and particularly enjoyed the recipe titles. 

One "Square Meals" recipe, made with beets and sour cream, was called “Blushing Beetski Salad.”  I regret not having copied it down.  The title amused me enough to stick in my mind.  I still remember it all these years later, even though I've forgotten most of the ingredients in the salad, and all of the quantities called for.

Last week I was looking for something different to serve as a salad course and, since the name came to mind, I decided to make a "Beetski Salad" of my own.  I used the simplest of ingredients and, although my salad didn’t blush, it was mighty tasty.  The leftovers stood up well in the fridge too, making a nice addition to my lunch the following day.

We liked this recipe well enough that I've added it to my recipe file.  It's acidity makes a pleasant counterpoint to pork and would pair well with chicken too.

To make Beetski Salad, you’ll need:

  • About a cup of pickled beets, cut in a half-inch dice
  • About a cup of crisp apple, with the peels on, also cut in a half-inch dice
  • 2 Tablespoons plain yogurt
  • 2 Tablespoons mayonnaise
  • Salt, pepper, and paprika to taste
Measure the first four ingredients in a bowl and stir them together until they’re well combined.  Taste and adjust the seasoning. 

That's it.  I told you it was simple!

I plated this salad on a bed of lettuce, and sprinkled a little paprika over it just before serving it.  It was definitely not the prettiest girl at the party but what it lacked in beauty, it made up for in taste.  :)

Thursday, 17 May 2012

Broccoli Cheddar Soup


I went to the grocery store early on Saturday morning, to check the specials at the meat counter and on the produce aisle.  I didn’t bring home any meat but I did bring home a rather large bag of broccoli from the marked down shelf.  It still had good colour and a pleasant, fresh scent but I knew it wouldn’t keep long, so I steamed the lot of it and then looked for ways to incorporate the cooked broccoli into our menu over the following days.

I'm trying to do a little more forward planning with regard to work-day suppers, so one of the things I used our broccoli for was a cheddar broccoli soup.  It was on our Meatless Monday menu this week.

In order to bump up the broccoli flavour in the soup, I made the vegetable stock for the soup from the broccoli steaming water, and added the broccoli stems to the stock ingredients.  The soup turned out very well; with good broccoli flavour and a pleasant, creamy texture.  It made a satisfying supper that we both enjoyed.

If you would like to make Cheddar Broccoli Soup, you’ll need:

  • 3 Tablespoons butter
  • 1/2 cup diced onion
  • 3 Tablespoons flour
  • 1-1/2 cups vegetable stock (see note above)
  • 1-1/2 cups low fat evaporated milk (not sweetened condensed!)
  • 1-1/2 cups grated sharp cheddar
  • 1-1/2 to 2 cups broccoli, cooked to tender-crisp
  • Salt, white pepper, and nutmeg to taste

In a large saucepan or Dutch oven, melt the butter over medium-high heat and use it to sautรฉ the onion.  When the onion softens and becomes translucent, mix in the flour.  Lower the heat to medium and continue stirring and cooking for about 5 minutes.  You don’t want the roux to take on much colour but you do want to cook the raw flavour out of the flour.


Once the roux has cooked, gradually stir in the vegetable stock, mixing well after each addition so that the roux dissolves completely into the stock.  Once all the stock has been incorporated, add in the milk and mix well.  Continue cooking until the soup thickens and is almost at a boil.


Add in the cheddar and stir until it has melted into the soup.


Add in the broccoli and continue cooking the soup for just a couple of minutes, until the broccoli is heated through.


Taste the soup, adjust the seasonings, and serve it immediately.
_________________________________
This post is linked to Hearth and Soul Blog Hop hosted by The 21st Century Housewife, Premeditated Leftovers, Savoring Today, Elsa Cooks, Zesty South Indian Kitchen, and Penniless Parenting.
Hearth & Soul Hop

Tuesday, 15 May 2012

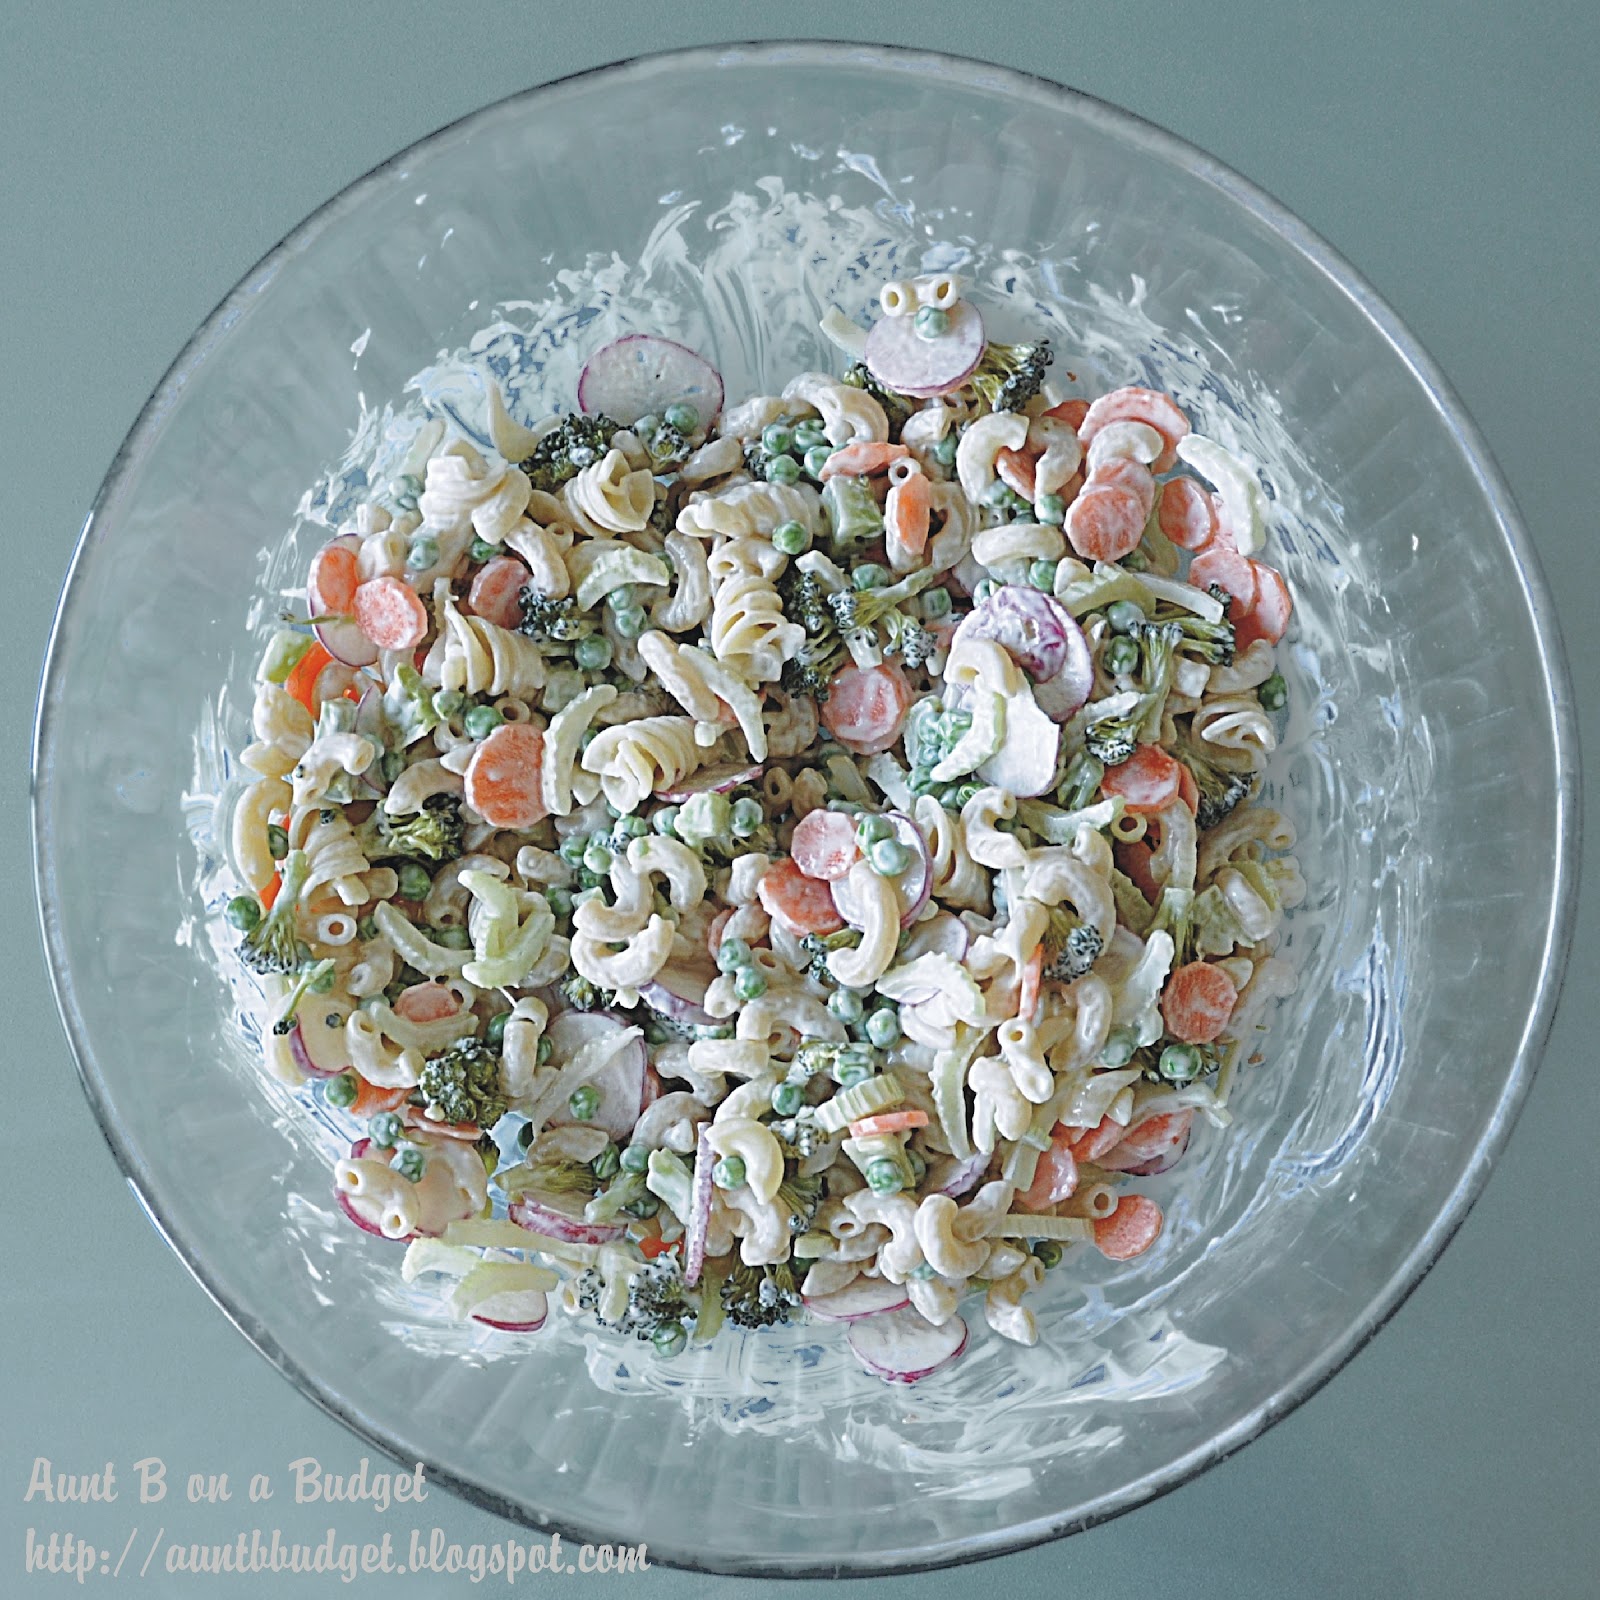
Wakawoni Salad


Do you know a single kid who doesn’t like macaroni?  Me either. 

One of my favourite little boys used to call it “wakawoni” and the name has stuck at our house.  Any dish made with pasta elbows is now officially wakawoni to us.

My husband – who is, in actuality, just a really big kid – loves all things wakawoni.  He’d eat mac and cheese year round, but I want something at least a little lighter during the warm months.  This salad keeps us both happy. 

I know full well that no self respecting Italian would ever serve pasta cold, but we North Americans are a colouring-outside-the-lines kind of bunch when it comes to food.  We're not big rule followers. We’ll happily try just about any combination and presentation of foods, just to see if it will work.

My wakawoni salad is one of those “just to see if it will work” kind of dishes.  I made it up decades ago, as a young wife just learning the basics of housekeeping and home cookery.  One day, needing to use up all sorts of little bits from the fridge and not wanting to go to the grocery store to buy ingredients for supper, I took what I had on hand and put it together to make a salad. 

I’ve continued to make wakawoni salad every summer since, varying the vegetables each time I put it together.  The only constants are the bacon, the macaroni, and the mayonnaise.  It turns out well every single time.  If you’d like to make it too, here’s what you’ll need:


  • 1 cup of uncooked macaroni (I was short on macaroni so I used a combination of macaroni and rotini.)
  • 1 pound of bacon
  • 3 to 4 cups of vegetables, either raw or cooked, cut into bite sized pieces
  • Salt and pepper


Cut the bacon into 1-inch pieces and cook it in a large pan or Dutch oven, over medium heat, until most of the fat renders out and the bacon crisps.  Scoop it out of the pot with a slotted spoon, draining as much fat as possible, and put it on a paper-towel-lined plate to drain and cool.

Pour off as much fat as you can from the bacon cooking pan.  (I save it in a jar in the fridge and use it in other dishes.)  Leave the little brown bits in the bottom of the pan and add enough cold water to the pot to cook the pasta in. The brown bits from the bacon will help to flavour the pasta as it cooks.

Bring the water to a boil, add a generous amount of salt (it should taste like the ocean) and stir in the macaroni.  Let the pasta cook to al dente, drain it, and rinse it with cold water until its cooled to room temperature.  Leave it in the colander for a few minutes, giving it a gentle shake now and again, so that you can be sure as much water has drained off as possible.

Prepare your vegetables, cutting them into bite-sized pieces. 

In a large bowl, combine the pasta and vegetables, tossing them gently with your fingers to mix the veggies through the macaroni.  Mix in just enough mayonnaise to bind it. 


This salad is always best served very cold so, at this point, I refrigerate the macaroni and vegetable mixture for at least an hour.  Keep the bacon separate from the rest of the salad but refrigerate it too. 

Just before service, mix the bacon into the salad.  Plate it either on a large platter for family style service or on individual plates.  Serve immediately.


______________________________________
This post is linked to to Tasty Tuesday hosted by Balancing Beauty and Bedlam.

Beauty and Bedlam

Monday, 14 May 2012

What We Ate May 7 - 13


I’m still struggling with this organization thing, but I think I’m getting better at it.  I’m looking at the next day’s supper the night before, or even a day or two ahead of time, and trying to plan meals that I can either make ahead or that my husband can help with. 

The husband helping part means we’re more carnivorous these days but I’m working on that too.

We are both enjoying the first of the spring produce.  It’s a treat to be able to eat locally grown lettuces, green onions, and radishes.  Our friend Jo gave us a bag of strawberries this week too.  They were awfully good.

Here’s what we ate last week:

Monday, May 7:
  • Breakfast – Eggs, toast, apples
  • Supper – Pinto beans and brown rice, a salad of green leaf lettuce, shredded carrots, radishes and tomatoes with a dressing of homemade Greek-style yogurt mixed with a little roasted garlic aioli and flavoured with lemon zest, lemon juice, chives and dill.  Homemade rhubarb ice cream for dessert.

Tuesday, May 8:
  • Breakfast – Leftover rice and beans, canned pears
  • Supper – Homemade shake and bake chicken, steamed corn and green beans from the freezer, canned cherries.

Wednesday, May 9:

Thursday, May 10:
  • Breakfast – Eggs, toast, canned peaches
  • Supper – Cold chicken, salad of brown rice, leftover corn, diced tomatoes and basil in an herb vinaigrette, apples

Friday, May 11:
  • Breakfast – Granola and yogurt
  • Supper – Tomato and black pepper spaghettini in kale pesto, cucumber, kalamata olive and onion salad with red wine vinaigrette, tapioca pudding

Saturday, May 12:
  • Breakfast – French toast, bananas
  • Supper – Wakawoni salad, canned peaches

Sunday, May 13:
  • Breakfast – I was in a hurry and forgot to eat.  Something that rarely happens with me!
  • Supper – Slow cooker pot roast with caramelized onion gravy, brown rice, steamed broccoli, beetski salad

PB&J Muffins


Because the price has increased so much lately, peanut butter is firmly consigned to our “treat list."  A couple of weeks ago, though, I found it at Costco for a price I haven’t seen in years:  Squirrel smoth peanut butter was priced at less than $3.00 for a 1 kg jar.  The expiration date on the jars was distant enough that I splurged and bought two.

I know that the Squirrel peanut butter I bought at Costco is not as good for you as an all-natural peanut butter would be, but we’ve had some issues with all natural nut butters at our house. 

The oil rises to the top of the jar in an all-natural peanut butter and my husband steadfastly refuses to stir the butter in the jar before using it.  He ends up spreading runny, oily-textured goo on his toast, and I end up throwing away the layer of near-solid, unuseable sludge that accumlates at the bottom of the jar.  My guy dislikes the flavor of the goo, and I resent the waste that results from having to throw the sludge away. 

It’s been known to cause aruguments between us.  :^/

Life is too short to argue about peanut butter so I buy Squirrel and console myself that most of what we eat is actually quite healthy.

Anyway…

Since I have an abundance of affordable peanut butter in the house right now, I’ve been doing some baking with it.  I’ve missed the flavor so it’s been fun.

This weekend, I was thumbing through my old “Magnificent Muffins Cookbook” and came across a recipe for peanut butter and jelly muffins.  They looked like something the big guy would enjoy, so I baked some.

I can never leave a recipe alone so I tweaked it some, adding a jam filling to the muffins and using salted peanuts for the topping instead of plain blanched peanuts.  My fella liked them enough to say he thinks I should keep the recipe.

To make PB&J Muffins, you’ll need:

  • 2 cups flour
  • 1/2 cup sugar
  • 2-1/2 teaspoons baking powder
  • 1/2 teaspoon salt
  • 1/2 cup peanut butter
  • 2 Tablespoons butter
  • 2 large eggs
  • 1 cup buttermilk
  • about 1/2 cup jam or jelly (I used raspberry because I had a jar open.  Use whatever you like or have on hand.)
  • about 1/2 cup blanched, salted peanuts
Whisk together the flour, sugar, baking powder, and salt.  Work the peanut butter and butter into the flour mixture until it resembles course crumbs.


Whisk together the eggs and buttermilk until well combined.


Make a well in the center of the dry ingredients.  Add in the egg and buttermilk mixture and mix the batter until just combined.  You’ll end up with a fairly thick, somewhat sticky mixture.


Oil a muffin pan and spoon enough batter into the bottom of each muffin cup to fill it about one third of the way full.  This should use about half the batter.

Spoon some jam into each cup, on top of the batter.  I used about a teaspoon of jam for each
muffin.


The next part is a bit fiddly.  Spoon in some more batter so that it forms kind of a wall around the jam in each muffin.  Add another dollop of batter directly on top of the jam.  Wet your fingers and use them to smooth the batter so that the jam is completely covered.


Bake the muffins on the center rack of a preheated 350ยบF oven for 20 to 25 minutes. 
While the muffins are baking, spread the peanuts in a single layer in a baking pan and put them in the oven to toast.  Toast them just until you start to smell them cooking.  Be careful!  They burn quickly!  As soon as they’re warmed through and start to take on just a tiny hint of colour, remove them from the oven.

When the muffins are finished baking they should be lightly browned around the edges and should spring back when you press lightly on the tops.


Allow the muffins to cool in the pan for about 10 minutes, then remove them to a rack to cool completely.

When the muffins have cooled completely, chop the peanuts quite fine and put the chopped nuts into a small dish.

Put a quarter cup of jam into a microwave safe container and heat it for a few seconds. (I heated mine for 20 seconds on high.)  Give it a good stir to loosen it up.


Working with one muffin at a time, brush the top of each muffin with jam, coating the entire top of the muffin but not the sides.  Dip the jam-coated muffin top into to bowl of chopped peanuts, pressing down enough that chopped peanuts stick to the jam.  The peanuts pack down when you do this, so you’ll want to give them a stir with a fork between each muffin so that they continue to coat the tops evenly.


These muffins are best served at room temperature.  Leftovers can be stored in an airtight container and used up within a day or two, or they can be frozen.