Friday, 21 January 2022

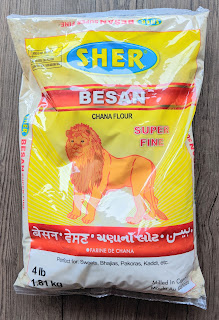
Why You Need This Stuff In Your Kitchen: Chickpea Flour


One of the hard realities of living on a limited food budget is that the less you have to spend, the fewer foods you have to choose from.

My home is on Vancouver Island, off the southwest coast of Canada. It's an expensive place to live and I'm on a fixed income, in a time of rapidly increasing inflation. I could choose to move somewhere with a lower cost of living but I've lived here almost all my life. My friends and family are here and I don't want to be further away from them. 

That leaves me with two choices: I can either cut a discretionary expense like internet or my car out of my budget and put the money saved toward buying food, or I can accept that my range of food choices is declining and figure out how to make the best of what I do have access to.  I've chosen the second.

Meat is incredibly expensive here right now so it's making fewer and fewer appearances on my plate and I'm okay with that. I'm an adept enough cook and know enough about basic nutrition to ensure that I get sufficient protein in my diet from other sources. I still include eggs and cheese in my diet but I also rely on nuts, seeds, whole grains, and legumes.  Especially legumes.  

If you look to other cultures that rely heavily on plants for the proteins in their diet, you'll soon see that beans, lentils, and peas play an important part in their cuisines. They're inexpensive, have an extraordinarily long shelf life, and - when well prepared - they taste good too. Dried legumes are often consumed in whole form, re-hydrated and cooked until tender, but they're also often ground into pastes or flours and added to dishes in these forms.

Chickpea flour is a cooking staple in India, and also found in Mediterranean and African cuisines. As the vegan lifestyle grows in popularity chickpea flour is seen more often in North American cooking too.  It's versatile and rich in nutrients. One cup of chickpea flour contains 20 grams of protein, 6 grams of fat, 10 grams of fiber, 30% of the recommended daily intake of thiamine, 101% of the recommended daily intake of folate, and 25% of the recommended daily intake of iron.

There are 2 commonly available forms of chickpea flour in the stores here: white chickpea flour/gram flour and besan flour, which is made from brown chickpeas and more finely ground. Both are similar in nutritional value. There are differences in the way they're cooked though. Vegan Richa wrote an excellent post about the differences between chickpea flour and besan. It's worth clicking through to read it. 

When you're cooking with chickpea flour, don't taste the raw batter. It'll taste awful and leave an unpleasant aftertaste too. When cooked, the flavour mellows into something slightly nutty and toasty; very pleasant.

I use chickpea flour in several ways:  

  • I sub it for half of the wheat flour in conventional baking powder or baking soda leavened recipes for pancakes, biscuits, cookies, etc. (You'll probably have to adjust the amount of liquid you add.)
  • I use it in Indian recipes, as instructed by the recipe writer.
  • I use it to make something akin to polenta, which I cool, then cut into pieces and use in a variety of applications. It can be used as a substitute in recipes that call for paneer or tofu, it can be cut into wedges or fries and baked, fried plain, or battered/breaded and then deep fried.
  • I make it into a thin batter - sometimes leavened and sometimes not - and cook it as I would crêpe batter, for use in place of tortillas.

There are a host of chickpea flour recipes on Pinterest. Pop on over there, take a look, and then give some of them a try. I'm sure you'll find something you like and, in doing so, you'll add variety and nutritional value to your menus while stretching your food dollars further.



Sunday, 9 January 2022

Affordable Eats: Homemade Oat Milk


Have you looked at prices in the grocery store lately?  I don't know about where you live, but here the price of everything is going up. 

I'm on a fixed income so when prices rise the only option I have is to change my spending habits. More and more things are being struck from my grocery list because I simply can't afford them.  Dairy prices are rising so yogurt is no longer on my shopping list and cheese is appearing on my table far less often. Milk prices are going up and nut milks, soy milk, rice milk, and oat milk have always been more expensive than cow's milk. Even so their prices are rising too.

Recently, I tried oat milk and found that it agrees better with my digestion than cow's milk or other non-dairy options so that's what I've been buying for the past couple of months. In addition to being kind to my tummy, oat milk contains fibre, iron, calcium, potassium, and B vitamins. That's some good nutritional value. Still, the cost...

While browsing Pinterest just before Christmas, I came across this post from Alpha Foodie. It looked easy to make and it would cost me pennies on the dollar in comparison to the stuff in the dairy case. I gave it a try and it worked so well I'm sharing it with you. Seriously, you need to make this. It tastes good and it'll save you money too.

Here are some notes based on my own batches:

I go for the "handful of soaked cashews" option because it gives the oatmilk a creamier consistency. Even with the cashews it's a lot less expensive than store bought.

I use unsweetened oat milk when cooking. If I'm drinking it as a hot beverage, I either sweeten it with maple syrup and add a little vanilla extract, or I use a Torani coffee syrup. Jenni Field's Pastry Chef Online's butterscotch coffee syrup is mighty fine too. 😊

If you choose to add the ingredients for any of the flavour variations listed in the post, you'll still save money over store bought.  

If you prefer the mejool date option to using maple syrup, you can use (less expensive) regular dates from the baking aisle instead, by soaking them in warm water then letting them cool to room temperature before you add them to the oat milk.

I hope you'll give this a try. It's a good budget stretcher.


Friday, 24 December 2021

Ice Cream Sandwiches For The Holidays


Ice cream?  At this time of year?  Heck, yes!  Every season is ice cream season at my house and from the very first time I saw
this recipe from April J. Harris, I knew I wanted to use them to make ice cream sandwiches.  They're so festive looking, and they taste great too.

I wanted to ensure that the ice cream sandwiches could mostly be prepared ahead of time and the cookies and ice cream were in rounds of similar diameter. The solution I came up with is simple, effective, and doesn't require the purchase of extra kitchen gear.

For every four ice cream sandwiches you plan to make, you'll need on 398 ml/14 ounce tin can. It's the size of tin most commercially canned cranberry sauce comes in, and many other canned fruits and vegetables too. Decide on how many servings you're going to need, then save your tins over time. Unless you have a cookie or biscuit cutter of the same diameter as the tins, you'll have to save an extra tin for cutting out your cookies.  You'll also need some kitchen parchment.

The ice cream should be the first thing you make because it can be kept in the freezer for several days before you plan to serve your ice cream sandwiches.  You'll be using the tin cans as ice cream molds so you should prepare them before beginning to make your ice cream.

Use a pencil to trace around the top of one of your tins onto a piece of parchment.  You'll need to make two circles for each tin you plan to use. Cut the circles out, cutting just inside the traced line so there's no graphite on the cut pieces.  

Cut a piece of parchment greater than the height of each tin. You'll use the full width of the parchment piece in each mold. Working one tin at a time, begin by rolling up this piece of parchment from one of its side edge,s into a tube smaller than the diameter of your tin.  Place the tube inside the tin, let go, and allow it to widen to conform to the sides of the tin.  

Place a parchment circle in the bottom of each tin.  I used the handle of a wooden spoon to gently push the circles into place at the bottom of the mold.

Now you're ready to make your frozen custard.  You'll need:

  • 5 large egg yolks
  • 2/3 cup sugar
  • 1 pinch salt
  • 1 cup whole milk
  • 2 cups heavy cream
  • 2-1/2 teaspoons vanilla extract

Whisk the egg yolks, sugar, and salt together until the mixture lightens to a pale yellow and becomes fluffy.

Stir the milk and cream together in the top of a double boiler and cook it over simmering water, stirring occassionally,  until little bubbles begin to appear on the surface.

Whisk one ladleful of the heated milk/cream mixture into the egg mixture until the two are thoroughly incorporated.  Add another ladelful of the milk/cream mixture and whisk it in. Continue ladling and whisking until all of the milk/cream mixture is combined with the egg mixture. Whisk in the vanilla extract.

Pour the custard through a seive into a pitcher, let it cool to room temperature, then put it in the firdge for a few hours or overnight.

Pour the chilled custard into your ice cream maker and process it according to the manufacturers instructions until it reaches the thickness of soft ice cream.

Spoon the ice cream into the prepared molds, filling them almost to the level of the top edge of the tin and then place a parchment circle on top, pressing it gently into place so that it helps level the top of the ice cream and there are no air bubbles between the ice cream and the parchment. One batch of ice cream should fill two tins with maybe a little bit left over.

Put the tins in the freezer and leave them there until you're ready to assemble your ice cream sandwiches.

Next, bake the cookies.  Here's a link to the recipe: https://apriljharris.com/cherry-christmas-cookies-an-old-fashioned-recipe/

Prepare the cookie dough following April's instructions right up to the point where she rolls the dough into cylinders prior to chilling them.  Instead of making cylinders, divide the dough in half and place one half onto a sheet of waxed paper.  Cover it with a second sheet of waxed paper and roll it out to about a 1/8 inch thickness. 

Use the waxed paper to transfer the rolled dough onto a baking sheet and then repeat the process with the other half of the dough. Put it in the freezer to chill.

When the dough is very cold bring out one rolled sheet and place it on your work surface.  Remove the top sheet of waxed paper.

Using your extra tin can, or a cookie or biscuit cutter the same diameter as the tins you're using for ice cream molds, cut out your cookies. You'll need two cookies for each ice cream sandwich plus a few extras in case of breakage. Gently remove the extra dough from between the cut cookies and use a paring knife to trim any edges where the cutter hasn't cut all the way through a cherry. 

Line a baking sheet with parchment.  Lift the cut out cookies, still on their sheet of waxed paper, over to the parchment lined baking sheet and quickly flip the waxed paper over so that the cookies are on the parchment.  Peel away the waxed paper and then move the cookies so they're evenly spaced on the parchment lined baking sheet.

Bake the cookies at 350F for about 10 minutes, just until they start to take on a tiny bit of colour along the bottom edge. Remove the baking pan from the oven to a wire rack and cool the cookies to room temperature.

Repeat this process with the other half of the cookie dough. 

Once at room temperature the cookies can be stored in an airtight container, or frozen, until you need them.

To assemble the ice cream sandwiches:

Working with one mold at a time, take the tin out of the freezer and dip the bottom of the can in a bowl of hot water for a few seconds to loosen the ice cream from the bottom of the tin.  Use the ends of the parchment sticking out from the top of the tin to pull the wrapped ice cream out of the tin.

Place the wrapped ice cream on a cutting board. Place 4 cookies bottom-side up on your work surface. Unwrap the ice cream and cut it into four rounds of approximately equal thickness and use a spatula to transfer one cut round of ice cream to each of the cookies you place on your work surface.  Top each sandwich with another cookie, facing right side up.

You can serve your ice cream sandwiches at this point or you can do this assembly a few hours before you serve your meal. If prepping ahead, arrange the sandwiches on a platter, cover them, and put the platter in the freezer until you're ready to serve dessert.


Thursday, 23 December 2021

Sesame Crackers


I made crackers last night. I know there are a great many commercially made crackers but, still, they're a regular part of my baking routine. Homemade crackers are delicious, inexpensive, and really easy to make.  You can add whatever you want to the dough and come up with your own unique flavours.

This recipe is an adaptation of the white cracker recipe in Marion Cunningham's "Fanny Farmer Baking Book."  The recipe's a blank canvas and over the years I've added all sorts of different seeds, nuts, and seasoning to them.  I chose sesame seeds this time because they provide a nice, slightly nutty flavour that's neutral enough to go with the meats and cheeses or with jams or fruit.

To make Sesame Crackers you'll need:
  • 1/2 cup raw sesame seeds
  • 2 cups of flour
  • 1 Tablespoon sugar
  • 1/2 teaspoons salt
  • 2 Tablespoons butter
  • 2/3 cup milk (plus a very small amount extra if needed)
  • 2 teaspoons flaked or coarse salt
Begin by toasting the sesame seeds. Pour them into a dry frying pan and cook them over medium heat, stirring constantly until they darken a bit and take on a golden colour.  You'll be able to smell their toastiness too. Sesame seeds are easy to overcook while toasting so pay careful attention and remove the pan from the heat as soon as they warm and deepen in colour.

Stir the flour, sugar, and salt together.

Cut the butter into small pieces, add it to the flour mixture, then use your fingers to rub it into the flour until it breaks down into small, irregular crumbs.

Add in the sesame seeds and stir them through the flour.

Use one hand to stir the flour mixture with a fork while you use the other to pour in the milk.  Keep stirring until the dough comes together and pulls away from the sides of the bowl. If the dough's too dry to come together add more milk, a few drops at a time. Use as little extra milk as you can manage. You want the dough to hold together but to stay as dry as possible.

Leave the dough in the bowl, cover it with waxed paper, and let it rest for at least an hour.

Roll the rested dough out as thinly as possible, using a little flour both under the dough and on top of it to keep the dough from sticking to either your work surface or your rolling pin.  You should aim for a 1/8-inch thickness.

Wrap the dough loosely around the rolling pin and transfer it to a parchment lined baking sheet.
 
Once it's on the baking sheet, score the dough into 1-1/2 x 2-1/2 inch rectangles (roughly the size of a business card).  Use a fork to dock the dough, poking a few holes in each rectangle.  

Sprinkle the flaked or coarse salt over the top of the crackers and press it in so it adheres to the dough.

Bake the crackers at 425F for 6 to 8 minutes, then flip them over, put them back in the oven and bake them for about 5 minutes more.

Remove the crackers from the oven and, as soon as they're cool enough to handle, break them apart.  If some of them aren't yet crispy, put them back in the oven and let them continue to crisp.

When the crackers have cooled to room temperature, store them in an airtight container.

Wednesday, 22 December 2021

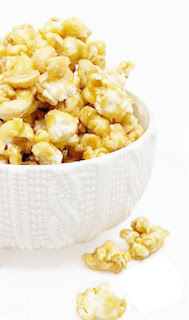
Nutty Caramel Popcorn

Sometimes you want something that's sweet and crunchy at the same time. Sometimes you want a sweet with a hint of umami in the background. Sometimes you want a big bowl of snack-y stuff that you can nibble on while watching a movie. This recipe is all of that.

The caramel corn part of this recipe isn't mine.  It comes from Paula Deen via Gluesticks blog. I just changed the quanities a bit and added in lots of nuts.  

I used peanuts and cashews because that's what I had on hand and the combination proved surprisingly good.  You can, of course, add whichever nuts you prefer.  If you want your mixture to be more salty, you could even add a commercially made mixture of salted mixed nuts.

To make this recipe, you'll need

  • About 5 quarts of popped popcorn (about 1/2 cup unpopped kernels, popped)
  • 2 cups each raw, unsalted peanuts and cashews
  • 1 cup butter
  • 2 cups golden sugar (light coloured brown sugar)
  • 1/2 cup light corn syrup
  • 1 teaspoon salt
  • 1 teaspoon baking soda

Pop the popcorn kernels in an air popper and pour them into a large roasting pan. I use the bottom half of the roaster I cook my turkey in.

Add the nuts to the popcorn in the roasting pan.

Combine the butter, sugar, corn syrup, and salt in a medium saucepan.  Heat the mixture over medium-high heat. When it comes to a full boil, set a kitchen timer for 5 minutes and continue to boil the mixture, stirring constantly.

At 5 minutes, remove the mixture from the heat and stir in the baking soda.

Pour the caramel over the popped corn and nuts. Stir it gently to coat them evenly.

Bake the caramel corn at 200F for one hour, stirring every 15 minutes.

Turn the entire batch out onto a sheet of kitchen parchment and let it cool.

Snack away!

If you don't eat the whole lot at once, store the leftovers in an airtight container and use it up within a couple of days.


Tuesday, 21 December 2021

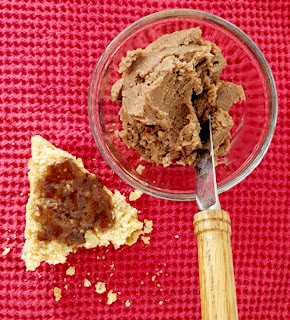
Maple Cinnamon Butter

Even the most accomplished of cooks (and I wouldn't ever claim that title as my own) have times when nothing in the kitchen goes according to plan. Things that should, logically, work out, don't.  It's frustrating but sometimes, if fortune favours the persistent, good things can arise from failure. This recipe is a case in point.

I wanted to make maple walnut scones and decided to adapt my favourite cream scone recipe using those flavours. The scones looked just as a good scone should - browned on the top, nicely risen, a little crumbly - but the flavour was insipid.  My tasters concurred, and we drew the conclusion that there just wasn't enough maple sugar in the recipe to carry the necessary flavour punch. Adding more maple sugar to the next batch didn't fix it, nor did the addition of maple extract to a third batch.  

In a last ditch effort, I made a maple and cinnamon butter to spread on the scones, hoping that the combination of the two would bring the necessary pizzazz to the plate. Even with the butter, the scones were not a hit with my tasters, but they liked the butter a lot.  One of them took the remainder of that first batch home with her and served it to her family with French toast the following morning.  The only complaint from her family was that they wanted more.

I made a batch of plain biscuits to try the butter with and that was tasty so I spread some on toast the following morning. That was good too. 

I told my tasters that I couldn't post just the butter recipe because it wasn't pretty enough to photograph. (It's hard to make a bowl of dark brown spread look appealing in any light.) They replied "But it tastes good. Share it anyway" so - un-pretty though it is - I'm sharing my maple cinnamon butter with you. You can serve it with your Christmas breakfast. 🎄😊

Flavoured butters are very simple to make. For this one, you'll need:

  • 1/2 cup salted butter, at room temperature
  • 6 Tablespoons maple sugar (if yours is not in very fine granules, you should zhuzh it up in your blender until it's powdery.)
  • 1 teaspoon cinnamon
Put all the ingredients in a bowl and whip them together until well combined.  Spoon into a covered container and refrigerate overnight to let the flavours marry. Allow it to return to room temperature before serving it - unless you're molding it as described below.

If you want to get fancy with your presentation, you can spoon the butter into indiviual chocolate molds while it's still soft from mixing, and then set the molds in the fridge overnight. While it's still very cold, unmold the butter and arrange it on a pretty plate, or place one or two pieces on each bread plate at the table. 

Make more than you think you'll need.  If the people at your table enjoy this butter as much as my tasters did, you'll go through it quite quickly.  Leftovers can be stored in an airtight container in your fridge or freezer.


Monday, 20 December 2021

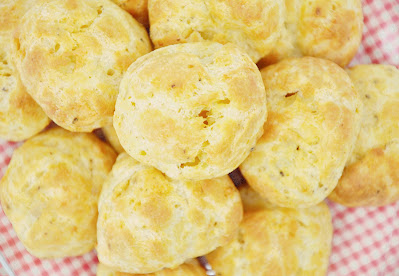
Cheddar and Black Pepper Cheese Puffs


Aside from family gatherings, my mom and dad didn't do a lot of entertaining.  Every New Year's Eve, though, they and several other couples from our neighbourhood would go dancing at the Legion hall.  After last call, they'd adjourn to one house or another, taking it in turn in a casual sort of way.  On the years when they came to our house my mom would serve an assortment of food, always including cheese puffs. She'd make them in advance, re-crisp them in the oven, then serve them warm.

With the coming of the Food Network and a general broadening of our knowledge of foods from many cultures, people started calling cheese puffs gougères but, whatever the name, they're still the same tasty, easy-to-make pastry.  Since French gougères are made with Gruyère cheese and the French are very particular about accuracy in food names and I baked mine with cheddar, I'm choosing to call mine cheese puffs just as my mom did.

Gougères are made with pâte à choux (cream puff pastry); a dough entirely leavened by eggs.  The pastry is put into a hot oven 425F to ensure a rapid souffléing of the eggs, causing the dough to rise. After a few minutes the heat is lowered to prevent the puffs from becoming too brown. The process is vulnerable to excess moisture so dry cheeses are preferable in this batter. My cheese puffs work because the cheddar I use (Old Edinburgh) is aged, crumbly and - for a cheddar - quite dry. 

Don‎'t be intimidated by pâte à choux. Provided you follow the instructions carefully, it's easy to make.

You'll need:

  • 4 eggs
  • 1 cup flour
  • at least 1 Tablespoon of freshly ground black pepper; a coarse grind
  • 1/2 cup milk
  • 1/2 cup water
  • 1/2 cup butter, cut into Tablespoon sized pieces
  • 1/4 teaspoon salt
  • 1-1/4 cups finely grated cheddar
Put the eggs in a bowl and cover them with hot tap water.

Measure the flour into a small bowl and use a fork to stir in the pepper

Combine the milk, water, butter, and salt in a saucepan and bring them to a boil.

Reduce the heat to medium-low and add the flour all at once.  Stir until the flour absorbs the water and becomes a thick dough. Continue stirring the dough, breaking it apart with the back of a wooden spoon now and then, until it stops steaming. You want any excess water in the dough to evaporate. The dough cooking process will leave a skim coating of dough on the bottom and sides of the pan.

Remove the pan from the heat and let it rest for about 5 minutes.

Add the eggs one at a time, beating each one thoroughly into the dough before adding the next.

Stir in the cheddar cheese, mixing until it's evenly distributed throughout the dough.

Spoon or pipe the dough onto a parchment lined baking sheet.

Bake the puffs at 425F for 10 minutes, then reduce the heat to 350F and cook them until they're a light golden brown.

Take the baking sheet out of the oven and pierce each puff twice with the sharp tip of a paring knife.

Put the pierced puffs back in the oven and turn off the heat so any excess moisture inside the puffs can evaporate.


If you're making your cheese puffs ahead of time, you can re-crisp them by putting them in a 350F oven for a few minutes.

These cheese puffs can be made in any size from 2 to 4 inches in diameter.  

I serve the small ones warm, with a bowl of pepper jelly for those who wish it.  

Larger puffs can be opened, any moist dough in the middle removed, and then filled with meat or vegetables in a sauce, a little good mustard topped with shaved roast beef or ham and - for the beef - a dollop of horseradish, or an apple pie filling made with diced apples.