Showing posts with label christmas baking. Show all posts

Wednesday, 15 December 2021

Lemon Poundcake With Candied Pineapple And Crystallized Ginger


In mid-November, British Columbia was hit by a series of rainstorms that Environment Canada described as "atmospheric rivers." They brought so much rain that catastrophic flooding and mudslides ensued, driving thousands of people from their homes and damaging highways and railways so severely that southwestern BC (where I live) was cut off from the rest of Canada.  Most people have returned to their homes but the damage to infrastructure is going to take months to repair. 

One highway connecting the affected areas to the rest of the country has now been re-opened, but only to essential travel.  It's a treacherous drive, still prone to flooding, with entire lanes of highway missing; sloughed off into canyons, washed away by rivers, or buried under tons of mud and stone and the journey is now complicated by snowfall and the potential for avalanches. The drivers who make the trip are heroes in this story. 

Because of the limited traffic, essentials are being given transport priority and, as much as we all love our Christmas treats, seasonal baking ingredients don't rank high on the list.  Some things, including candied and glace fruits and certain spices, have disappeared entirely from grocery store shelves.  

I had the good fortune to have done my big holiday shop just before the storms but, still, there were some things I forgot to buy and now I'm now having to do without them.  If it isn't in my pantry, it won't be on my table this Christmas.

Two things I do have on hand (because I like them a lot and try to keep them in my pantry year 'round) are candied pineapple and crystallized ginger. While not a typical holiday combination, both are included in many seasonal recipes so I decided to make something that paired them. This poundcake is what I came up with.

This cake is cerainly not the prettiest girl at the dance but she's probably the one you'd take home to Mom. Substantial in texture, bright with the flavours of lemon, pineapple, and ginger, and blessed with a comparatively long shelf life, this recipe's a winner. It freezes beautifully too.

To make this cake you'll need:

  • 1-1/2 cups each finely diced candied pineapple and crystallized ginger
  • 4 eggs
  • 3 cups all purpose flour
  • 1/2 teaspoon each baking powder and baking soda
  • 1 teaspoon salt
  • 1 cup butter, softened 
  • 2 cups sugar
  • 1 Tablespoon each grated lemon zest and lemon extract
  • 1 cup buttermilk

Butter and flour two 8-/12 x 4-1/2 x 2-1/2 inch loaf pans or one 10-inch bundt pan.

Cut the candied pineapple and crystallized ginger into a fine dice; 1/4 inch or smaller.

Put the eggs in a bowl and pour hot tap water over them. Let them stand for several minutes to warm gently.

Sift the flour, baking powder, baking soda, and salt into a large bowl, then stir them well with a fork to ensure they're evenly mixed. 

Add in the candied pineapple and crystallized ginger and stir again so the fruit is coated with the flour mixture.

Put the butter in a large mixing bowl and beat it until it's smooth and creamy.

Slowly add in the sugar, beating constantly until smooth and well blended.  

Add the eggs all at once and beat until the mixture is light and fluffy. 

Add about half the flour mixture to the bowl and beat until well blended.

Stir the lemon zest and lemon extract into the buttermilk, then beat half the buttermilk into the batter.

Add in the remaining flour and buttermilk mixtures and beat until the batter is well blended.  

Pour the batter into the prpared pans and bake at 325F until a skewer or toothpick inserted in the middle of  cake comes out clean.  This can take between 1 and 1-1/2 hours.

The cake will brown quite a bit around the edges.  If it's becoming too browned for your taste, turn the oven off towards the end of the cooking time and let the cake finish cooking in the residual heat.

Put the cake pans on a wire rack and allow them to cool for 5 minutes before turning the cakes out.  Allow the cakes to cool completely before slicing them.

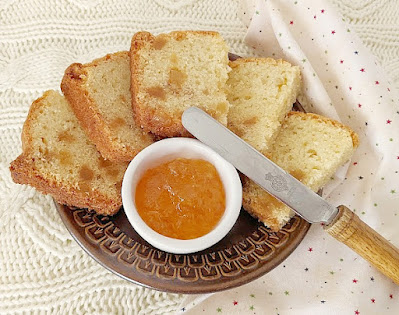
As you can see from my photo, I like to serve this cake with marmalade. It's a lovely accompaniment to afternoon tea.  It's also good toasted and then topped with a scoop of vanilla ice cream, or lemon or orange sorbet. If you want to get fancy about it, you can drizzle the ice cream or sorbet with a little Grand Marnier or Triple Sec.

Enjoy. 😊


Tuesday, 14 December 2021

Toffee Crunch Squares


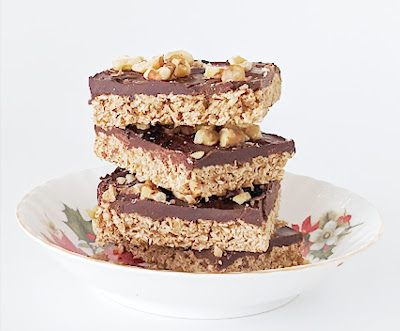
Look at these squares. You see that somewhat plain looking bottom layer? Don't be fooled. THAT, my friends, is a whole lot of delightful, toffee crunchiness just waiting to surprise you.

My husband loved English toffee. I suspect English toffee is called other things in other place but, basically, it's a delectable sweet made with a layer of hard toffee, covered by a layer of chocolate, with finely chopped almonds pressed into the chocolate before it sets. I used to buy it at Purdy's (a BC chocolatier) and give it to him at Christmas-time every year.  

Unfortunately there came a year when it wasn't within my means to buy my guy his treat from Purdy's. I searched for recipes I could make at home instead and eventually settled on this one, from a Quaker Oats advertisement in the 1993 Family Circle Christmas magazine. The oats in the bottom layer of these squares are not a traditional ingredient in English toffee but we both liked a good oatmeal cookie and the flavour combination was appealing. It was comparatively inexpensive to make too.

The squares were so well received that I've made them almost every Christmas since. The only adaptations I've made to the recipe are the way in which I prepare the pan before baking, and the use of walnut pieces, rather more coarsely chopped than the almonds on an English toffee. You, of course, can use nuts or not, as you prefer, and chop them more finely or not, as suits your taste.

Before I give you the recipe, I want to talk to you about preparing the baking pan:  

The crunch in this recipe comes from sugar, melted in the oven and then allowed to harden and cool.  It can be difficult to get the cooled squares out of the pan.  I get my best results by first buttering a 10 x 15 inch jelly roll pan and then lining the bottom of the pan with parchment. I prepare the parchment before buttering the pan, tracing around the bottom of the pan with a pencil and then cutting just inside the traced line so no pencil is on the paper that goes into the pan. Once the parchment has been cut, I butter the bottom and sides of the pan liberally and then set the cut parchment on top of the butter.

To make Toffee Crunch Squares, you'll need:

  • 4-1/2 cups oatmeal (either quick cooking or old fashioned but never instant)
  • 1/2 teaspoon salt
  • 1 cup firmly packed brown sugar
  • 3/4 cup butter, melted
  • 1/2 cup corn syrup
  • 1 Tablespoon vanilla extract
  • 2 cups semi sweet chocolate chips
  • 2/3 cup chopped nuts (optional)

Stir together the oatmeal, salt, and brown sugar until the sugar is evenly distributed throughout.

Add in the butter, corn syrup, and vanilla extract. Stir until all of the dry ingredients are moistened and the mass sort of sticks together.  It'll still be a bit crumbly.

Transfer the oatmeal mixture to the baking pan and press it out to fill the pan in an even layer.

Bake in a pre-heated 400F oven for 18 minutes, until brown and bubbly.

Sprinkle the chocolate chips over the baked oatmeal mixture as soon as it comes out of the oven. Let them sit for 10 minutes and then use a knife or an offset spatula to spread the melted chocolate so it completely covers the baked oatmeal mixture. 

If you're using them, sprinkle on the chopped nuts while the chocolate is still soft.

Let the pan cool completely, then cut your squares. A knife with a thin but not flexible blade will work best for this.  

I don't recommend that you freeze these bars. They lose some of their crunchiness if frozen and then thawed.


Thursday, 2 December 2021

Tiny Mincemeat Turnovers


Many years ago, wanting to serve mincemeat as one flavour among many on a Christmas dessert table, I decided to make tiny turnovers. They needed to be small enough to be one of several treats on a sampler plate. The turnovers, which offered a small portion of mincemeat wrapped in flaky pastry, with granulated sugar on top to provide a little extra sweetness and crunch, were a big hit. They weren't the prettiest thing on the table but proportion of mincemeat to pastry was just right.  I still get requests for them every year and they remain a Christmas baking staple at my house.

Every good turnover begins with pastry.  When you buy a turnover at a bakery it will most likely be made with puff pastry but since my turnovers were going to be tiny, I thought that puff pastry's volume would overwhelm the filling.  I opted instead to make a simple lard pastry; the one I've used to make countless pies over the years. 

I'm giving you the quantities needed to make enough pastry for a single pie crust or about a dozen tiny turnovers.  The recipe is easily doubled.  I find, though, that if you want to make more than double this recipe, it's best to make a second batch. I can't explain why this is, but experience has taught me not to question good results.

To make the pastry, you'll need:
  • 1 cup flour
  • 3/8 teaspoon of salt 
  • 1/2  cup lard. well chilled
  • 2 Tablespoons very cold water
  • 1 egg white + 1/2 teaspoon of cold water in a separate small bowl
  • granulated white sugar

Stir the flour and salt together until well combined.  Cut the lard into the flour.  I tend to leave the lard in fairly large pieces—about the size of a kidney bean—because it’s always better to leave it too large than to break it down too small.  A light hand will result in a flakier crust.


Stir the water into the flour and lard mixture just until the ingredients are moistened and start to hold together.  Gently form the dough into a rough ball.

Wrap the pastry in plastic wrap, or put it in a small enough container that there's not a lot of airspace around it, then seal the container with a lid. Refrigerate the dough for at least an hour. (I usually make the pastry one day and then roll it out the next.)

After the pastry has rested in the fridge, return it to the counter and allow it to warm for a few minutes.

Place the dough on a piece of waxed paper at least 12 inches square.  Gently press it into a thick disk and cover it with a second piece of waxed paper.  

Rolling out from the center towards the edges and rotating a quarter turn after each roll, roll the pastry until it's a uniform thickness and large enough to have reached, and perhaps slightly exceeded, the factory cut edges of the waxed paper.  

Gently remove the top sheet of waxed paper. If you're going to be using the scraps to roll the pastry out a second time, set the paper aside.

Use a round cookie cutter to cut rounds of pastry, cutting them as closely together as you can. (I use a 3-inch diameter biscuit cutter.) You should dip the cookie cutter in flour before cutting the dough, and again whenever the pastry starts to stick to it. 

Gently remove the pastry from around the rounds you've cut, leaving only the rounds on the waxed paper.  Lightly press the pieces of pastry you've removed together, using only as much pressure as is required to get the pieces to stick to one another. If you end up with a smooth ball of dough, you've pressed too much.  Set this pastry aside.

Spoon a scant teaspoon-full of mincemeat into the center of each cut round of pastry.  

Using a brush or your fingertip, apply water around the outside edge of each round before folding it in half, making a sort of half moon shape. Gently press the edges together to seal them.

Transfer the turnovers to a parchment lined baking sheet. Discard the bottom sheet of waxed paper.

Use a fork to beat the egg white and water together until it's frothy, then brush a little of the egg white mixture over the top of each turnover. Sprinkle some sugar over the egg white. You don't want a thick layer of sugar but you do want most of the upper surface of the turnovers to be lightly covered with it.

Place the scraps of pastry you removed from the first rolling onto a fresh sheet of waxed paper.  Cover the pastry with the top sheet of waxed paper you set aside and repeat the rolling, cutting, filling, and topping process again.

When you've made as many turnovers as you need, place them in a 400F oven and immediately turn the oven down to 350F.  Let them bake until they're lightly browned. I can't tell you exactly how long that'll take because it will depend upon the size of turnovers you've made and the quantity of mincemeat you've filled them with. I find that mine take about 30 minutes to bake.

I store my tiny turnovers in the same way I would store cookies: layered in a tin with a round of wax paper between each layer. They can be frozen, but thawing them will soften the sugar on the outside.  You may want to return them to the oven for just long enough to allow them to re-crisp.


Wednesday, 1 December 2021

Orange and Mincemeat Muffins


Eep!  It's December already!  

No matter how many early Christmas posts I share December always catches me by surprise. Not that I don't love it, I do. I enjoy the lights, the music, Christmas movies, Christmas cards, time spent with friends, and - of course - the food. I'm just never entirely ready for it all, you know? Maybe it's because I'm usually working really hard at this time of year...Or maybe I'm just easily distracted.  lol!

One thing I did manage to get done ahead of time this year was some cooking. I've prepared a whole bunch of recipes as my Christmas gift for you. I'll be sharing one every weekday (Monday through Friday) from now until November 24.  This is the first one. 😊

I enjoy a good muffin. A muffin and a cup of coffee or tea ranks high on my list of small indulgences.  In fact, I could be considered the president of the muffin fan club. lol!

This orange and mincemeat muffin is all good things to me.  Because, muffins. And, Christmas flavours. And, comfort food. Yay! 

Here's the recipe:

  • 1-1/2 cups flour
  • 2 teaspoons baking powder
  • 1/2 teaspoon salt
  • 1 egg
  • 1/2 to 3/4 cup sugar (Adjust this to taste according to the sweetness of the mincemeat you're using. I tend to prefer the smaller amount.)
  • 1/3 cup oil
  • 1 cup mincemeat
  • The zest from one large navel orange
  • The juice from the orange together with enough milk to make 1/2 cup of liquid

Combine the flour, baking powder, and salt in a small bowl and stir them gently with a whisk or fork.

Put the egg, sugar, oil, mincemeat, and orange zest into a large bowl. Stir until well combined.

Add the flour mixture to the wet mixture, along with the orange juice/milk mixture. Stir them together just until combined. The batter should be quite thick and slightly lumpy. It's okay if a little bit of flour is still showing here and there.

Spoon the batter into a prepared muffin pan (either greased or lined with baking cups), filling each cup about 3/4 full.

Bake the muffins in a 350F oven for about 25 minutes or until the tops spring back when lightly pressed with a finger.

Let the muffins cool in the pan for a few minutes, then transfer them to a rack. They're good either warm of cold. 

Orange and mincemeat muffins are delicious on their own, or with butter and marmalade. You could even serve them instead of scones at afternoon tea, or for dessert, with marmalade or lemon curd and a generous dollop of whipped cream.

Enjoy!