Last week I shared a post about making a Father's Day card using a page from a battered children's book I found in a thrift shop. I enjoy making homemade cards like that. For me, they're more personal than a pre-printed greeting card from a store.
Homemade cards do present a unique challenge though, because they are rarely the same size and shape as envelopes commonly available for purchase.
There are two ways to meet the challenge of matching envelope and card. You can either make your card to fit an envelope you already have, or you can make an envelope to fit your finished card. Since I would rather not limit the size and shape of the cards I make, I most often choose to make an envelope myself.
Making an envelope is very simple, really. You'll need:
- Paper. An 8-1/2 by 11 inch sheet of paper will make an envelope sufficient for any card size up to 5 x 7 inches. If your card is larger, you'll need a larger piece of paper or you'll need to use more than one piece. Don't limit yourself to just plain white paper here: Any paper sturdy enough to hold together in the mail can be used. Maps, magazine pages, wrapping paper, pages from old books, even cardboard cereal boxes and the like all make good envelopes.
- A ruler
- Something to score your paper with. A bone folder is nice but most anything with a hard narrow edge will do. I use the tip of a metal knitting needle.
- Something to cut your paper with. I use an Xacto knife but scissors will work fine too.
- Double sided tape or a glue stick. I prefer double sided tape for sealing the edges and flaps of my envelopes because it's easy to use and holds very well. A glue stick works too, although it's not the best choice for envelopes that will be going in the mail. If you use a glue stick, be sure to let the glue dry well, and ensure that your envelope won't be exposed to a lot of moisture.
- If your paper is heavily patterned, you'll also need some small pieces of blank paper to glue onto the envelope as address labels.
Begin by laying out your envelope's design.
You'll need to measure your card and make the height and width of your finished envelope both about 1/4 inch greater than the height and width of your card. My Father's Day card measured 6 inches wide and 4-3/4 inches tall so my finished envelope needed to measure 6-1/4 inches wide by 5 inches tall.
I make the back of my envelopes an inch shorter than the front so that the card sticks up above the edge, making it easier to remove the card from the envelope. Since the finished envelope would be 6-1/4 inches wide and 5 inches tall, the back of the envelope needed to measure only 4 inches tall.
I make the envelope flap - the piece that folds over and seals the envelope - 1-1/2 inches tall.
Here's how I laid it out:
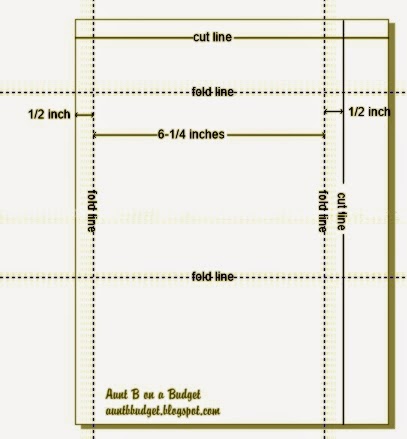
First I marked the vertical lines at 1/2 inch (first side flap), 6-3/4 inches (the space that would hold the card), and 7-1/4 inches (the second side flap.
Then I marked the horizontal lines. The first one needed to be 1 inch shorter than the height of the finished envelope so I marked it at 4 inches. This piece would become the envelope back. I marked the second one (the space that would hold the card) at 9 inches and the third horizontal line was marked at 10-1/2 inches. This would become the flap that closed and sealed the envelope.
I scored where you see the dotted lines. The solid lines at the top and right-hand side are cutting lines.
Here's how I assembled it:
First I trimmed away the excess paper.
Then I trimmed the envelope flaps. You only need the side flaps on the center portion of the card so I trimmed away the top and bottom, angling my cuts as shown.
Here's a close up of one of the cuts with the score lines marked in so you can see the approximate angles I used. You don't have to be all precise about this, just don't cut away so much paper than you won't have enough overlap with the flaps to allow for tape or glue.
Next I applied my double sided tape to both edges of the back-of-the-card portion (the bottom piece) and across the long edge of the envelope closing flap (the very top edge of the unfolded envelope).
Once the tape was applied, I folded the side flaps inward along the scored fold lines.
Then I folded the bottom section along the first horizontal scored line from the bottom edge, to make a crease. I opened it again, removed the white protective strip from the double sided tape, then folded the bottom section back up, carefully pressing the tape into place against the envelope's side flaps.
With the protective strip still in place on the top flap, I folded along the top-most horizontal scored fold line, to make a crease.
I put the card in the envelope, removed the protective strip from the tape on the envelope flap and sealed the envelope. All that remained was to address it, put a stamp on it, and drop it in the mail.
If you're using a patterned paper to make your envelopes (like some of those pictured at the top of this post) you'll want to glue some rectangles of white paper onto the envelope front to use as mailing labels. I use paper cut from used envelopes for making labels. It's thrifty and I make use of something that would otherwise end up in the recycling bin.
Easy, right? And handy to know. I hope you find this post useful. :)


