Monday, 16 June 2014

How To Make An Envelope


Last week I shared a post about making a Father's Day card using a page from a battered children's book I found in a thrift shop.  I enjoy making homemade cards like that. For me, they're more personal than a pre-printed greeting card from a store.  

Homemade cards do present a unique challenge though, because they are rarely the same size and shape as envelopes commonly available for purchase.  

There are two ways to meet the challenge of matching envelope and card.  You can either make your card to fit an envelope you already have, or you can make an envelope to fit your finished card.  Since I would rather not limit the size and shape of the cards I make, I most often choose to make an envelope myself.

Making an envelope is very simple, really.  You'll need:

  • Paper.  An 8-1/2 by 11 inch sheet of paper will make an envelope sufficient for any card size up to 5 x 7 inches.  If your card is larger, you'll need a larger piece of paper or you'll need to use more than one piece.  Don't limit yourself to just plain white paper here:  Any paper sturdy enough to hold together in the mail can be used.  Maps, magazine pages, wrapping paper, pages from old books, even cardboard cereal boxes and the like all make good envelopes.
  • A ruler
  • Something to score your paper with.  A bone folder is nice but most anything with a hard narrow edge will do.  I use the tip of a metal knitting needle.
  • Something to cut your paper with.  I use an Xacto knife but scissors will work fine too.
  • Double sided tape or a glue stick.  I prefer double sided tape for sealing the edges and flaps of my envelopes because it's easy to use and holds very well.  A glue stick works too, although it's not the best choice for envelopes that will be going in the mail.  If you use a glue stick, be sure to let the glue dry well, and ensure that your envelope won't be exposed to a lot of moisture.
  • If your paper is heavily patterned, you'll also need some small pieces of blank paper to glue onto the envelope as address labels.


Begin by laying out your envelope's design.  

You'll need to measure your card and make the height and width of your finished envelope both about 1/4 inch greater than the height and width of your card.  My Father's Day card measured 6 inches wide and 4-3/4 inches tall so my finished envelope needed to measure 6-1/4 inches wide by 5 inches tall.

I make the back of my envelopes an inch shorter than the front so that the card sticks up above the edge, making it easier to remove the card from the envelope.  Since the finished envelope would be 6-1/4 inches wide and 5 inches tall, the back of the envelope needed to measure only 4 inches tall.

I make the envelope flap - the piece that folds over and seals the envelope - 1-1/2 inches tall.

Here's how I laid it out:


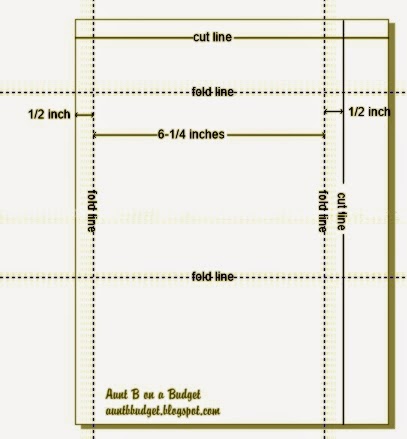
First I marked the vertical lines at 1/2 inch (first side flap), 6-3/4 inches (the space that would hold the card), and 7-1/4 inches (the second side flap.

Then I marked the horizontal lines.  The first one needed to be 1 inch shorter than the height of the finished envelope so I marked it at 4 inches.  This piece would become the envelope back.  I marked the second one (the space that would hold the card) at 9 inches and the third horizontal line was marked at 10-1/2 inches.  This would become the flap that closed and sealed the envelope.

I scored where you see the dotted lines.  The solid lines at the top and right-hand side are cutting lines.

Here's how I assembled it:

First I trimmed away the excess paper.


Then I trimmed the envelope flaps.  You only need the side flaps on the center portion of the card so I trimmed away the top and bottom, angling my cuts as shown.


Here's a close up of one of the cuts with the score lines marked in so you can see the approximate angles I used.  You don't have to be all precise about this, just don't cut away so much paper than you won't have enough overlap with the flaps to allow for tape or glue.


Next I applied my double sided tape to both edges of the back-of-the-card portion (the bottom piece) and across the long edge of the envelope closing flap (the very top edge of the unfolded envelope).


Once the tape was applied, I folded the side flaps inward along the scored fold lines.


Then I folded the bottom section along the first horizontal scored line from the bottom edge, to make a crease.  I opened it again, removed the white protective strip from the double sided tape, then folded the bottom section back up, carefully pressing the tape into place against the envelope's side flaps.

With the protective strip still in place on the top flap, I folded along the top-most horizontal scored fold line, to make a crease.


I put the card in the envelope, removed the protective strip from the tape on the envelope flap and sealed the envelope.  All that remained was to address it, put a stamp on it, and drop it in the mail.

If you're using a patterned paper to make your envelopes (like some of those pictured at the top of this post) you'll want to glue some rectangles of white paper onto the envelope front to use as mailing labels.  I use paper cut from used envelopes for making labels.  It's thrifty and I make use of something that would otherwise end up in the recycling bin.

Easy, right?  And handy to know.  I hope you find this post useful.  :)

Meal Plan: June 16 to 20

I often avoid writing a meal plan because I tend to over-estimate how much the two of us will eat and, that results in waste.  Waste is a big no-no in my kitchen!  Lately, though, a change in circumstance is requiring more organization of me so I'm giving meal plans a try once again.

Here's my plan for the work week this week. There are no lunches included because we usually eat lunch separately, availing ourselves of the opportunity to use up left-overs.  


I may well break from this plan along the way if I have food to use up, or if unforeseen scheduling changes arise, but it's a start.

Want to see how I do with sticking to the plan?  I share a "What's for Supper" post on my Facebook page Monday through Friday, usually between two and three, Pacific time.

Want to play along?  Share your menu plan in the comments below this post on Facebook, or join our conversation there on weekday afternoons.

Here's my plan for this week:

Monday, June 16:
 
Breakfast  - Red River cereal, bananas
 
Supper  - Rajma Chawal (one of my favourite Indian bean dishes), brown basmati rice, a salad of romaine, celery, cucumber, and shredded carrot with blushing beet salad dressing.  Orange and banana smoothies for dessert.
 
Here’s the recipe for the Rajma Chawal:
http://www.archanaskitchen.com/recipes/indian/main-course-dal-kadhi-curry-recipe/95-rajma-chawal 
 
and here’s the recipe for the salad dressing: http://auntbbudget.blogspot.ca/2013/03/blushing-beet-salad-dressing.html
 
Tuesday, June 17:
 
Breakfast – Homemade yogurt with stewed rhubarb stirred in, topped with homemade granola
 
Here’s how I make my yogurt:
http://auntbbudget.blogspot.ca/2012/03/making-yogurt-in-thermos.html
 
Supper – Patties made from Sunday’s leftover Rajma Chawal and rice, with sautéed onions and sweet bell pepper mixed in, served in homemade whole wheat pitas, with some of the previous night’s salad and salad dressing tucked in too.  A cold plate of carrots, celery, bell pepper, and pickles.  Home canned peaches for dessert.
 
Wednesday, June 18:
 
Breakfast- Boiled eggs, whole wheat toast, applesauce
 
Here’s my recipe for whole wheat bread: http://auntbbudget.blogspot.ca/2012/01/whole-wheat-bread.html
 
Supper - Homemade gnocchi with herb plantain and sunflower seed pesto.  (Not the banana family plantain but the wild herb I forage while out on my walks.  I’ve pasted an explanatory link below.)  Fresh tomato wedges, a salad of grated carrot, thinly sliced celery, and red onion, with a red wine vinaigrette.  Homemade orange sorbet.
 
Click here to read about herb plantain: http://www.prairielandherbs.com/plantain.htm
 
Thursday, June 19:
 
Breakfast – Oatmeal and applesauce
 
Supper - Hamburger steaks with onion gravy, mashed potatoes, roasted golden beets and carrots, steamed peas.  Grapes.
 
Friday, June 20:
 
Breakfast – Home canned plums,  applesauce bran muffins.
 
Here’s the link for the muffins:
http://auntbbudget.blogspot.ca/2011/12/applesauce-bran-muffins.html
 
Supper - A soup made from the leftover hamburger steak, leftover gravy, homemade vegetable stock, leftover peas and carrots, and barley.  Cheese toast on home made whole wheat bread.  Fresh strawberries macerated in a little sugar and lemon juice, topped with a dollop of whipped cream.
 
Here’s how I make my stock:
http://auntbbudget.blogspot.ca/2012/09/stock-making-basics.html 

Thursday, 12 June 2014

Reuben's Cousin Yonni

Three things:

First, a name:  My fella's name is John, but for all of his growing up years his father, who emigrated here from eastern Europe, called him Yonni.

Second, a food:  My guy's favourite deli sandwich is a well made Reuben.  He orders them whenever we're in a place he feels confident will offer both good bread and good smoked meat.

Third, a recipe, invented by my fella, while thinking of a Reuben, using what we had on hand:  He named it Reuben's Cousin Yonni.  

Works for me!  :)

This is a one-pound link of garlic sausage.  


Quality charcuterie it ain't, but it is widely available here, inexpensive, and has a pleasant, mild flavour.  My fella loves it.

We don't buy garlic sausage often but company affords us a good excuse to put some in the fridge.  

One of our local grocers sells a four-pack of garlic sausage for the same price as two individual links so, when we do buy garlic sausage, we splurge and buy the bulk pack.  

That's what we did when planning a cold plate lunch for company a while back.  We served one link to our company, put one in the fridge for later, and put the remaining two in the freezer.

Half of the "link for later" got fried and served for breakfast the next day, along with eggs.  The day after that, my fella made these sandwiches for supper. 

Here's what he used to make them:

  • 4 slices of pumpernickle bread
  • 1/2 pound of garlic sausage, thinly sliced (He ended up having enough slices left over for another sandwich at lunch the next day so I guess, really, he used about 1/3 pound of sausage for our two sandwich supper)
  • thinly sliced havarti cheese (I'm not sure how much.  Enough to make a generous layer in each sandwich.)
  • 1 cup of sauerkraut, well drained
  • 2 Tablespoons of homemade Thousand Island salad dressing 
  • 4 Tablespoons of butter, at room temperature


Here's how he assembled the sandwiches:


He buttered the outside of one of the slices on each sandwich, 


then placed them, one at a time, butter-side-down in a preheated pan over medium heat.  

Once the sandwiches were in the pan, he buttered the  other slice of bread.


He let each sandwich cook until it was toasted on one side before flipping it and toasting the other.  

Once the sandwiches were toasted on both sides, my fella transferred them to a baking sheet and put them in a 350F oven for a few minutes to finish melting the cheese.


My guy served the sandwiches right away, while the cheese was all nice and hot and melty, with fresh veggies on the side and more Thousand Island dressing for dipping. 

The bread was so dark in colour before it was toasted that it looked almost black when the sandwiches were cooked, but it smelled toasty, and didn't taste burnt at all. 

It was a delicious supper.

Tuesday, 10 June 2014

Spaghetti With Sauteed Zucchini and Grape Tomatoes

These plastic packages of small tomatoes are another food item I don't often buy.  

I usually purchase locally grown tomatoes at the farm market, and usually large tomatoes rather than grape or cherry tomatoes, because they're less expensive. I bought these for a company lunch though, because I didn't have time to go to the market, and because I know they are consistently flavourful and sweet.

Turned out I needn't have bothered.  My wee tomatoes sat on the platter virtually untouched and that, in its turn, turned out to be a good thing.  I found myself in need of a very quick supper later in the week and those grape tomatoes provided the foundation for the meal.  

I made a simple, fresh spaghetti dish. The whole meal was assembled in the time it took to cook the pasta, and it was delicious.

Here's the recipe:


  • 8 ounces spaghetti (I used rice pasta but any spaghetti you like will be fine)
  • 2 Tablespoons extra virgin olive oil
  • 2 cups diced zucchini (1/2-inch dice)
  • 1 pint of grape tomatoes, halved
  • dried oregano to taste (I used about 3/4 teaspoon)
  • salt and pepper to taste


Cook the spaghetti in boiling, liberally salted water, according to package directions.

While the spaghetti is cooking, saute the zucchini in the olive oil.  Cook it until it's tender crisp and has taken on a little colour.


Add in the tomatoes, some dried oregano, and 1/2 cup of pasta cooking water.  Cook the tomatoes until they're heated through and have begun to break down just a little bit.


Drain the spaghetti while it's still quite al dente, with a couple of minutes cooking time left.   Reserve a little more of the pasta cooking water, just in case. 

Stir the drained pasta into the sauteed vegetables.  Continue cooking, adding more pasta cooking water if needed to keep the noodles moist, until the pasta is done.


Season the dish to taste with salt and pepper and serve it right away, while it's still piping hot.


Monday, 9 June 2014

Re-Vision:Father's Day Card From a Thrift Store Book


I was brought up to treat books with something bordering on reverence so, although I admire the many book-based art and craft works I see on line, I hesitate to attempt them myself.  There are some books, though, that have been so "well loved" by the time I get them that even I can overcome my qualms at pulling them apart.

This is particularly true of thrift store children's books.  By the time they make it to the store shelves, they've often been handled so many times that they are near to falling apart without any help at all from me.  Their pages are tattered and worn and decorated with crayon drawings. 

I like them a lot.  They have colourful illustrations that are useful for projects and a ton of personality too, simply because they are so very tattered.

They're inexpensive too!

I bought a stack of Little Golden Books at a "dollar-a-bag" sale at one of our local thrift shops last fall, and have been using them to make cards ever since.  


So far, my $1.00 investment has yielded me illustrations for more than 30 cards, and I still have some pages to use up.  

Since Father's Day is coming up soon, I thought I'd show you the card I made my step-dad, using a page from an old Family Circus book.


I began by removing the covers.  To do that I pulled off the book's spine.  There are some fairly sharp staples in there so be careful.  


Once the spine and its staples were removed, the book came apart easily.  


I chose this page for my Father's Day card.


I measured the illustration.  If I used it as it was, I'd have to pay extra postage for oversized mail. One of our local stationary stores had a special on colour photocopying, so I spent $0.39 + $0.02 tax to have a copy made at 80% of the image's original size.

Consider carefully before choosing to have a photocopy made.* At sale price, my photocopy cost $0.41.  It would have cost me $0.85 in extra postage to mail an oversize envelope. The regular price for colour copies in our area is $1.00 page.  Had the copies not been on sale, I would have chosen to pay the postage.

I cut around the image, removing all the background colour and print from the page.


Once I had trimmed the picture, I dug through my scrap box to find a piece of paper suitable for use as a background.  


I printed my caption onto the background paper (I used my computer printer but you could certainly do this by hand, too), 


then glued the image onto the background paper below the caption.

I used a glue stick to affix the image to the background.  I like glue sticks.  They're inexpensive, readily available, and they don't dry immediately.  If I need to re-position an item I've glued, I'm able to peel it off the background and then put it back where I want it to be.


I trimmed around the image and background to get the card size I wanted.  It measured 6 inches wide by 4.75 inches tall.


Next, I printed the inside caption (Have a relaxing Father's Day) on a blank piece of card stock.  

Here's how I calculated where to position the caption:  


Once the caption was printed, I measured 4.75 inches up from the bottom edge of the card (as shown in my diagram), scored my fold line, and folded the card across.

Card making magazines and scrap booking instructions will tell you to use a bone folder to score fold lines but, really, any hard, thin edge will do.  I use the tip of a knitting needle to score my lines.  It works just fine


Using the bottom of the folded card as a guide, I used a ruler and an X-acto knife to trim away the excess paper.


I glued my assembled image onto the front of the card, using the bottom and left edges as a guideline.  The image wasn't a perfect fit, but close enough.  


Again, I used a ruler and X-acto knife to trim the card down to its finished size.  I also trimmed away the little un-matching bits from the bottom and left edges.


And that was it: the card was finished.  All that remained was to write a personal message inside it and mail it.  

Cute, isn't it? I was pleased with how it turned out.  :)


____________________________

*Usually if the card or image is a gift or for personal use rather than for profit, it is permissable to use an image from a book. If you are making cards or other artwork for sale and plan to incorporate either a page culled from a book or a photocopy of an image used in a book, it is always good practice to contact the publisher and request permission to use the image.  Failure to do so may be construed as a violation of copyright law.  

Give credit where credit is due: Whether you are using an image from a book for personal use, for a gift, or with publisher's permission for sale, you should always make a note on your finished work correctly attributing the source of the illustration, its original publishing date, the publisher, and the name of the illustrator.

The illustration I used to make my step-dad's card was made by Bill Keane and comes from the book "The Family Circus:Daddy's Surprise Day."  It was published in 1980 by The Western Publishing Company, Inc., and copyrighted by The Register & Tribune Syndicate, Inc.


Thursday, 5 June 2014

Crispy Homemade Chicken Strips


Vegetable Thins crackers are a guilty pleasure of mine.  I know that they're processed food, and that they contain ingredients I don't normally eat, but they taste so darned good!  If I have them in the house, I'm likely to wolf them down like potato chips.  


We had company recently, and I seized upon the excuse to buy me some crackers.  When I got to the store, I found that they were on sale for $1.63 a box if you purchased multiples of three.  

Yay! 

Of course I bought three!

When our company left there was still one box of crackers left.  I needed to make something quick for supper the next day, so I decided to bash those crackers up into crumbs and use them as breading for chicken strips. 

Here's how I made the chicken strips:

I cut four boneless skinless chicken breasts into strips and then made a breading station, with a pie plate of flour, one of beaten eggs, and one of cracker crumbs.


I dipped each strip first in the flour, then in the egg, then in the cracker crumbs, and placed them on a parchment lined cookie sheet like this:


(There were lots of crumbs left over when I was done breading the chicken.  I could probably have breaded at least two more chicken breasts from what I had.  Next time I'll only bash up 2/3 of the bag, and save the rest for snacking.)

I baked the chicken strips on the middle rack of a 400F oven for 25 minutes.  They didn't change colour much, but they did brown on the bottom and around the edges.


I served the chicken strips with little bowls of ranch dressing, for dipping.  They were delicious:  crispy on the outside, and moist inside.  

Easy, right?  You know you want to try them.  :)

Tuesday, 3 June 2014

Food I Don't Usually Buy, and a Recipe

We had visitors recently, on a day I didn't feel like cooking. There were three teenagers in the group, and more than one picky eater, so I decided to take the easy way out.  I went to the grocery store the morning our company was due to arrive, and bought cold cuts, cheeses, crackers, a jar of antipasto, and some fresh fruit and veggies.  

When our guests arrived, I assembled the food on platters and put out plates and napkins, then let everyone pick and choose as they preferred.  It was an excellent solution to my "don't want to cook" dilemma, and made for a relaxed and pleasant visit.

Because I always prefer to have leftovers rather than not offer enough food, when our guests departed there was still quite a bit left on those platters, including several items we buy but rarely.  

Cold cuts, commercially made crackers, bottled antipasto, and cherry tomatoes are all luxuries rarely allowed for in our grocery budget and, not wanting them to go to waste, I planned several very simple meals around what we had on hand.  

Despite the simplicity of the meals we made from the leftovers, they felt like special treats to us because of the ingredients used to make them.  I'm going to share those dishes with you over the next several posts, beginning with this one:


Baked Eggs and Tomatoes in Ham Cups


Years ago, on one of her 30 Minute Meals programs, Rachel Ray made baked eggs in prosciutto cups.  I don't have the exact recipe but, really, do you need one?  I had 4 slices of black forest ham left over from our special lunch so I decided to make my own version of Rachel's dish.  

I used:


  • 4 very thin slices of black forest ham
  • 1 cup of finely diced tomatoes
  • 4 eggs
  • salt and pepper


I began by pressing the ham slices into muffin cups.  (I used a silicone muffin pan because of its non-stick properties.  Easy clean-up is a big deal for me.)


Rachel crisped her proscuitto by putting it in the oven so I put my ham lined muffin cups in a 350F oven for 10 minutes.  They did lose some of their moisture but they didn't crisp, and they kind of folded over on themselves, making it more difficult to spoon in the rest of the ingredients.  


You can decide whether or not you want to bother with this step.  If you do, I'd recommend a hotter oven, maybe 400F.

I spooned in the chopped tomatoes.  I seasoned mine with salt and freshly cracked black pepper.  My fella doesn't care for pepper so I seasoned his with just salt.  


I cracked an egg into each cup.  


I put the pan back in the oven to bake.

On the show, Rachel cooked her eggs for about 10 minutes.  At 10 minutes my eggs were still so raw that the whites were almost clear.  (Maybe Rachel cooked hers at a higher temperature, or maybe she used a convection oven.)

At 20 minutes, our eggs were pretty much perfect.  The whites were cooked and the yolks still soft.


They came out of the silicone pan really easily.  I served them immediately, with a salad on the side.

Great supper!  Nice and light, but really tasty.  I'll do this again (without the crisping the ham step).

Here are some other recipes I made using leftovers from our company lunch: